Deprecation notice: As of mid-2022, the FreshBooks (Classic) product and API have been discontinued by FreshBooks. This add-on is no longer available for download.
If you would like Gravity Forms to consider supporting other FreshBooks products, you can register your interest on our Product Feature Roadmap page.
Summary
Before the FreshBooks Add-On can be used with Gravity Forms, you will first need to create a feed. A feed simply allows form submission data to be sent to another source. In this instance, form data being sent to FreshBooks.
Create a Feed
To create a feed for FreshBooks using the FreshBooks Add-On for Gravity Forms, do the following from your WordPress Admin Dashboard.
- Click on Forms in the left side menu.
- Select the form that you want to use with FreshBooks.
- Once within your desired form, hover over Settings and click on FreshBooks.
- Click Add New to create a new feed. You will be presented with the FreshBooks feed settings screen.
Feed Settings Screen
The following fields are available within the settings screen. Refer to the settings screenshot below.
- A feed Name is required. It is only used for identification and will not be shown anywhere other than your feed listing.
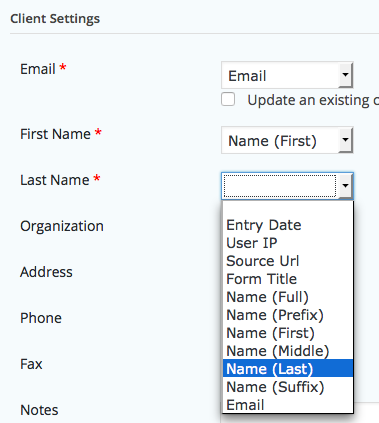
- Client Settings: Map the fields on your form with fields available within FreshBooks by selecting your form fields in the dropdowns to the right of each item.
- In the Notes field you can define any custom notes you would like to be placed into FreshBooks. This field also supports merge tags to dynamically generate content. To view the available merge tags, click the icon to the right of the field.
- Invoice/Estimate Settings: Create an invoice or estimate within FreshBooks when the field is submitted. For more information on these, take a look at our Invoice/Estimate Settings in Freshbook Add-On Feeds article.
- Conditional Logic: If unchecked, every successful form submission will be sent to FreshBooks. If you wish to set specific conditions for sending form data to FreshBooks, then check the “Enable Condition” box and fill out your required criteria.
- Click the Update Settings button to save your options.
Setup FreshBooks Invoice or Estimate
One of the options available when setting up a FreshBooks Feed is the ability to create an invoice or estimate when a form is submitted. This is an optional step that will allow you to jumpstart the invoice or estimate process by creating one when a form is submitted. This will allow you to then go into FreshBooks and complete the invoice or estimate, saving you time in the process.
To create an Invoice or Estimate follow these steps:
- Select “Invoice” or “Estimate” from the “Also Create” option when setting up or editing a FreshBooks Feed.
- Map the PO Number field to an available Form Field. This is optional.
- Set a default discount percentage to apply to any invoice or estimate that is created with this feed. This is optional.
- Setup your line items by choosing fixed costs and quantities, or opt to pull costs and quantities from available form fields. You an add additional line items by clicking the plus icon. This is optional.
- Enter default invoice or estimate notes.
- Enter the default terms for the invoice or estimate.
- Now that you have setup a FreshBooks feed, when the form you selected is submitted, it will automatically send the data you have selected to FreshBooks and automatically create (or update) a client, invoice, or estimate.