Introduction
Within each Gravity Forms notification, you have the option of configuring additional routing. This is similar to conditional logic, in that different events can cause the notification to go to a different recipient. But unlike conditional logic, Routing can’t prevent the notification processing, it only provides the email address to be used for the Send To setting, therefore it’s important to make sure your routing rules will cover all the possible user choices to prevent scenarios where your routing setup doesn’t provide any email address and therefore the notification is processed with an empty value for the Send To.
In this article, we will show you how to configure routing options within your notification.
Configuration
- First, start by accessing the notification that you want to configure additional routing for. This can be done by accessing the form associated with the notification, hovering over Settings, clicking on Notifications, and then accessing the notification you want to manage. If you want to create a new notification, simply click the Add New button.
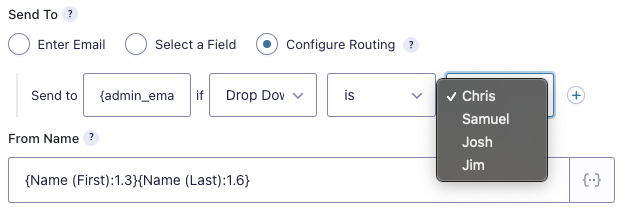
- Within the settings for your notification, you will see an option labeled Send To. If you select Configure Routing, additional options similar to conditional logic will appear.
- Inside the routing configuration, the first thing you will need to do is determine where the notification will be sent if the routing condition is met. Simply enter the email address of the user that you want to send the notification.
- Next, you’ll need to configure the field that the routing condition will use. To do so, use the dropdown box to select the field that the condition will be based on.
- Now that the field is selected, you’ll need to set the operator used to compare the field and value. For example, if you only want to send this notification if a particular radio button is checked, you would select is within the operator dropdown. Conversely, if you do not want a notification to be sent when that radio button field is selected, you would use is not.
- Finally, you’ll need to set the value that will be used to compare against the field submission result. If using pre-selected options, this will appear as a dropdown. If the field is something like a text field where the user will enter their own value, the condition value will appear as a text box. Within the condition value, enter the value to compare with the submission.
- If you want to add additional conditions or remove a condition, use the + and – icons to the right of the condition item to either add or remove it.
You can now continue configuring your notification as seen fit.
Troubleshooting
If Routing rules are not working as you expected there is a high likelihood that you’re facing one of the following:
- You added or modified field values after configuring Routing. Routing rules are based on existing values when you saved them, if you use a choices field like a Drop Down for your Routing rules, and you change any of these field choices after configuring Routing, you need to update your Routing rules to select the new or modified choice(s) and save your notification settings. It doesn’t matter if you just changed a single character, any change done to choices used in your Routing rules matters. The following screenshot shows an example of an outdated Routing rule, when it was configured the choice selected was Jim, but currently, that choice no longer exists, the Drop Down was edited and Jim was replaced by Samuel, therefore, the Routing rule will not work.
-
Your routing rules are not covering all the possible user selection. If your Routing rules are based on a drop down that has three choices, but you only have Routing rules added for two of the choices, the notification will fail when the user selects the third choice without a matching Routing rule.