Summary
Before the Emma Add-On can be used with Gravity Forms, you will first need to create a feed. A feed simply allows form submission data to be sent to another source. In this instance, form submissions to being automatically sent to your Emma account.
Create a Feed
To create a feed to Emma using the Emma Add-On for Gravity Forms, do the following from your WordPress Admin Dashboard:
- Click on Forms in the left side menu.
- Select the form that you want to use with Emma.
- Once within your desired form, hover over Settings and click on Emma.
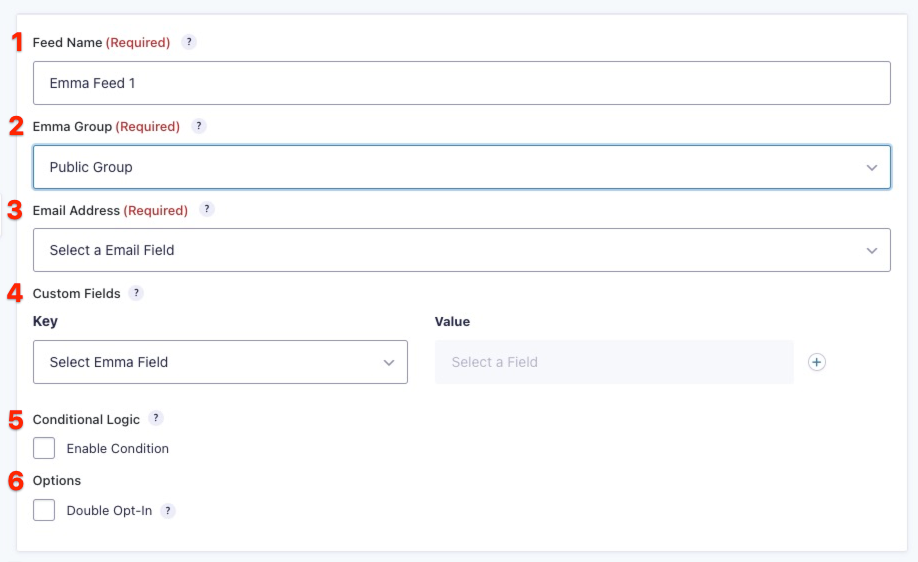
- Click Add New to create a new feed. You will be presented with the Emma feed settings screen.
Feed Settings Reference

This table describes the feed settings options you will be offered for an Emma feed.
| Setting | Description | Image Key |
|---|---|---|
| Name | To identify your feed when viewing the feed list page. Required | 1 |
| Group | The list that you would like to add the subscriber to. Required | 2 |
| Select the Email field in your form that represents the email address of the subscriber submitting the form. Required | 3 | |
| Custom Fields | Map each of the contact list fields to the desired form field that will contain that information. You can also create custom fields that will appear within your Emma admin by selecting Add Custom Field. | 4 |
| Conditional Logic | If unchecked, every successful form submission will be sent to Emma. If you wish to set specific conditions for sending form data to Emma, then check the “Enable Condition” box and fill out your required criteria. | 5 |
| Double Opt-In | If enabled, the user will receive an email from Emma and will need to click on a link within the email to confirm their subscription. |
Notes
- If Double Opt-In is selected, a subscriber will not be added to your group until they click on the opt-in link in the automated email they receive from Emma.
- It is recommended that you use both an opt-in condition and double opt-in in order to maintain a mailing list free of spam complaints.