Summary
This article lists the various setup options available for connecting to the analytics services available. Please note though that the setup, management, and education of the various Google Analytics technologies and services are beyond the scope of Gravity Forms support. We recommend you refer to the copious amount of materials already published by Google and many other third parties regarding the implementation of the various GA services.
This article uses the acronym “GA” to refer to the Google Analytics service.
Pre-Requisites
- Gravity Forms official Google Analytics Add-On downloaded and installed.
- A Google Analytics account setup and configured for the appropriate measurement type.
Acronyms
- GA – the Google Analytics service
- GA4 – Google Analytics 4
- GTM – Google Tag Manager
Settings Areas
The Google Analytics Add-On includes three areas for managing settings and options.
- Add-On Settings: installation of the add-on will create a normal add-on settings page under Forms → Settings → Google Analytics, which contains all the global settings related to connecting to Google. These settings are described in this article.
- Feed Settings: each form will now show a Feed Settings tab under form settings (Form Settings → Google Analytics → Feed Settings) for the form you are interested in. The Google Analytics Add-On feeds are used to trigger events related to submission of this particular form.
- Form Settings: each form will now show a Feed Settings tab under form settings (Form Settings → Google Analytics → Form Settings) for the form you are interested in. This area contains the settings related to events created by pagination of this form, unrelated to form submission.
Setup
- Navigate to the Forms → Settings → Google Analytics page.
- Choose the radio button next to the tracking connection type you wish to implement. See Connection Types below.
- Complete the connection by authenticating with your Google Analytics account (as required by the connection choice made).
- Upon successful connection, you will be returned to the Settings page to specify any additional connection type specific options. These as described below.
- Click Save Settings to initiate any script installation etc., you may have chosen. Upon successful authentication, more options may be presented to tailor your connection.
- Now you can set up form submission or form pagination tracking events in the form specific settings areas. Refer to this article for more information on those settings.
Connection Types
Google provides multiple methods of sending data to Google Analytics, so what connection type you choose will affect the behavior and capabilities of the analytics package. The Gravity Forms Google Analytics Add-On offers four connection types:
- Google Measurement Protocol
- Google Analytics
- Google Tag Manager
- Manual Configuration
If you are connected already, you must disconnect to see the connection options again. Your choice here will open up additional options, as described below. See this article for more information on the connection types available.
Connection Type Settings
Google Measurement Protocol Settings
Upon successful connection, there are no additional settings offered, except a button to disconnect.
Google Analytics Advanced Settings
| Setting | Description |
|---|---|
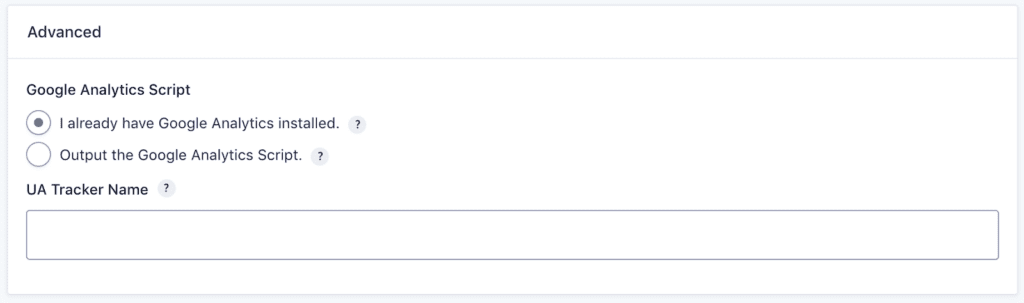
| Google Analytics Script | Whether Gravity Forms will output the Google Analytics tracking code to the site. The script is required for the add-on to function, but you have the option to skip this if another plugin is already adding it. If this is installed more than once on a site, you may see double occurrences of each event. |
| UA Tracker Name | If this add-on is being used to output the script, you can give the tracker a custom name. This is useful if there is more than one tracker on a page sending data to more than one analytics property. |
Google Tag Manager Settings
| Setting | Description |
|---|---|
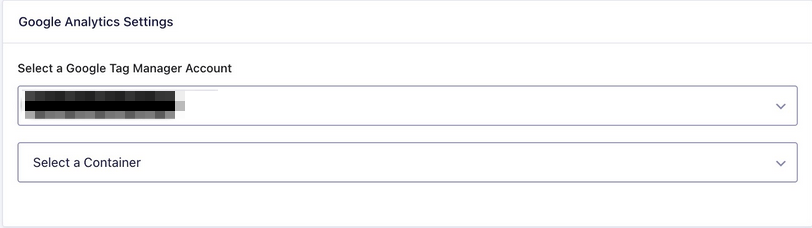
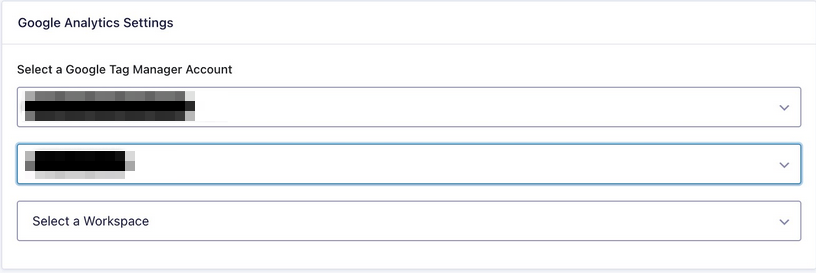
| Select a Tag Manager Account, Container and Workspace | Choose the tag manager account. Once selected, you will be offered a second drop down to select the container and a third dropdown to select the workspace within that account. |

| Setting | Description |
|---|---|
| Google Tag Manager Script | Whether Gravity Forms will output the Google Tag Manager Tracking ID to the site. The script is required for the add-on to function, but you can skip it if another plugin already adds it. |
Manual Configuration Settings
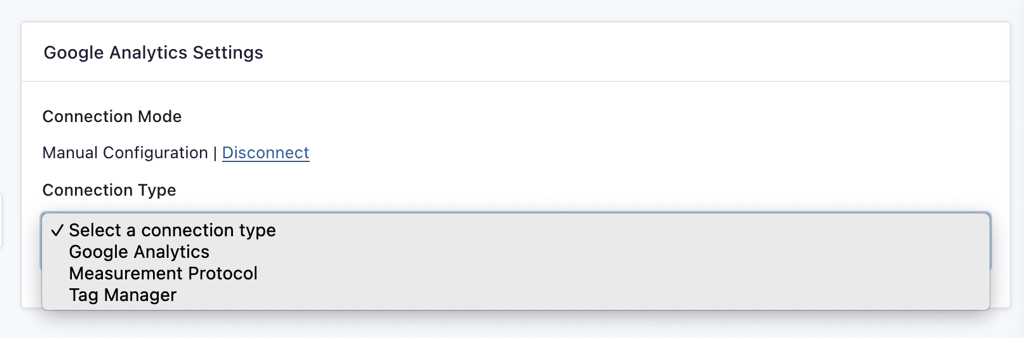
When using the Manual Configuration connection method, you will have the option to “Disconnect” or select from one of the three available Connection Types:
- Google Analytics
- Measurement Protocol
- Tag Manager
Google Analytics
When using Google Analytics via the manual connection method, you’ll need to enter the measurement ID of the property you want to send data to.
To find your measurement ID:
- Log into your Google Analytics account
- Click the admin icon in the bottom left
- Select the property you want to collect data for
- Click Data Streams
- Either select an existing data stream, or Add a new one.
If you’re adding a new data stream, select “Web” as the type - Open your data stream
- Look for your measurement ID in the top right of the “Stream Details” box
- It will be in the format of G-XXXXXXXXXX
Measurement Protocol
When using Measurement Protocol via the manual connection method, you’ll need to enter the measurement ID of the property you want to send data to and a measurement protocol API secret.
To find your measurement ID:
- Log into your Google Analytics account
- Click the admin icon in the bottom left
- Select the property you want to collect data for
- Click Data Streams
- Either select an existing data stream, or Add a new one.
If you’re adding a new data stream, select “Web” as the type - Open your data stream
- Look for your measurement ID in the top right of the “Stream Details” box
- It will be in the format of G-XXXXXXXXXX
To find your measurement protocol secret, or create a new one:
- Log into your Google Analytics account
- Click the admin icon in the bottom left
- Select the property you want to collect data for
- Click Data Streams
- Either select an existing data stream, or Add a new one.
If you’re adding a new data stream, select “Web” as the type - Open your data stream
- In the “Events” box, click on “Measurement Protocol API Secrets”
- Copy the “secret value” from the secret you want to use
- To create a new secret, click “Create” in the top right and give the secret a nickname
Tag Manager
When using Tag Manager via the manual connection method, you’ll also need to manually enter your tag manager container ID and your workspace ID.
To find your container ID:
- Log into your Tag Manager account
- Look in the top right corner next to the preview and submit buttons
- You should see your container ID in the format of GTM-XXXXXX
To find your workspace ID:
- Log into your Tag Manager account
- Look at the URL while on the Workspace tab
- The workspace ID will be the ID number after “workspaces/”.
If your URL ends in “workspaces/123456”, your workspace ID is 123456.
| Setting | Description |
|---|---|
| Google Tag Manager Script | Whether Gravity Forms will output the Google Tag Manager Tracking ID to the site. The script is required for the add-on to function, but you can skip it if another plugin already adds it. |
Next Steps
Now that you have a successful connection to your analytics account, you can configure the form submission and pagination triggers under the feed and form settings areas. See this article for more information.