Introduction
The Gravity Forms Webhooks Add-On can be used to send requests to the WordPress REST API endpoint added by the Events Calendar plugin, either locally or on another site, to create new events when a form is submitted.
Note: This article assumes you have installed and activated the Webhooks Add-On and the Events Calendar plugin. If not, you will need to do so before any of the functionality in this article can be used.
Configuring the Form
Create a new form and add the following fields.
| Type | Label | Other Settings |
|---|---|---|
| Single Line Text | Event Title | |
| Paragraph | Event Description | |
| Checkboxes | Event Options | Choices: All Day, Hide From Event Listings, Sticky in Month View, Feature Event |
| Date | Start Date | |
| Time | Start Time | Conditional Logic: Show field if Event Options is not All Day |
| Date | End Date | |
| Time | End Time | Conditional Logic: Show field if Event Options is not All Day |
Tip: Gravity Perks Limit Dates can be used to limit which dates can be selected in the date fields.
Configuring the Webhook
To configure webhooks for a form, go to your Form Settings and click on the Webhooks tab and then click the Add New button.
Next, using the image below as reference, you’ll need to configure the following settings for the request that is being made.
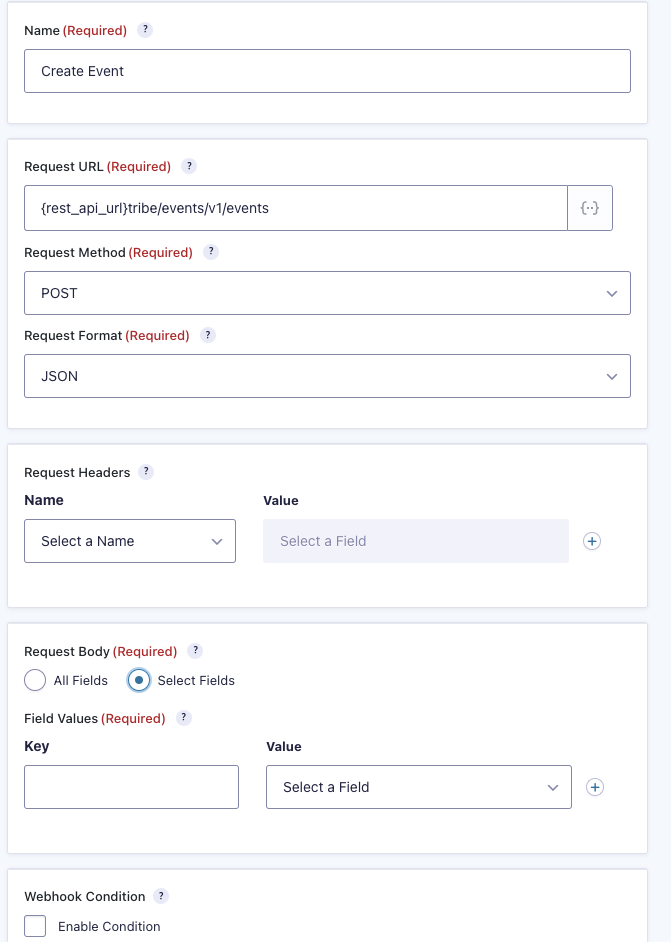
Name
Enter a name for your feed. This can be anything you want as it is only used for identification purposes on the feeds list page and in the add-on log.
Request URL
Enter {rest_api_url}tribe/events/v1/events
The {rest_api_url} merge tag will be replaced with the base REST API URL for the current site when the feed is processed.
If the Events Calendar plugin is installed on a different site you will need to substitute the {rest_api_url} merge tag with the base REST API URL for that site e.g. http://the-remote-site.local/wp-json/tribe/events/v1/events.
Request Method
Select the POST choice as the request method.
Request Format
Select the JSON choice as the request format.
Request Headers
There are no request headers to configure.
Request Body
Select the Select Fields choice.
Field Values
Configure rows for the following fields. Click the add item icon (+) to add new rows.
For the values, you can select from the form fields, entry meta, or Add Custom Value which will display a text input that supports Merge Tags.
| Key | Value |
|---|---|
| title | Select the Event Title choice. |
| description | Select the Event Description choice. |
| all_day | Select the All Day choice. |
| hide_from_listings | Select the Hide From Event Listings choice. |
| sticky | Select the Sticky in Month View choice. |
| featured | Select the Feature Event choice. |
| start_date | Select Add Custom Value and then enter the merge tags for the start date and time fields e.g. {Start Date:3} {Start Time:4} |
| end_date | Select Add Custom Value and then enter the merge tags for the end date and time fields e.g. {End Date:5} {End Time:6} |
You can also configure rows for any additional fields you may have included on the form which the Events Calendar plugin supports:
| Key | Description |
|---|---|
| author | The user ID of the event author |
| date | The date the event should be published |
| date_utc | The date (UTC timezone) the event should be published |
| slug | The event slug |
| status | The event post status |
| timezone | The event time zone |
| image | The event featured image ID or URL |
| cost | The event cost |
| website | The event website URL |
| show_map | Whether the event should show a map or not (boolean) |
| show_map_link | Whether the event should show a map link or not (boolean) |
The Events Calendar plugin requires some values (e.g. all_day) to be passed as booleans. For this, we will use gform_webhooks_request_data example #3 in the theme functions.php file or a custom functionality plugin.
Webhook Condition
If event creation should be conditional based on the value of a form field, select the Enable Condition checkbox and then configure the rules which should be met for this request to be sent.
Authentication
If you test the form after configuring the webhook you should find it fails to create the event and if logging is enabled you would find a line like the following:
DEBUG –> GF_Webhooks::process_feed(): Webhook successfully executed. code: 401; body: {“code”:”rest_forbidden”,”message”:”Sorry, you are not allowed to do that.”,”data”:{“status”:401}}
Most REST API endpoints will require authentication to ensure that the person making the request has permission to do so. With the Webhooks Add-On you can use the gform_webhooks_request_args filter in the theme functions.php file or a custom functionality plugin to add the authentication arguments.
gform_webhooks_request_args example #2 shows how you can use the standard cookie authentication for logged-in users making requests to the current site.
If you are making a request to a remote site or the user will not be logged-in on the current site, you would need to use an alternative authentication method such as Basic Authorization as shown in gform_webhooks_request_args example #3.
Alternative Method
If the Events Calendar plugin is installed locally and you don’t have an Elite or legacy Developer license and would prefer not to upgrade your existing license, you could use gform_after_submission example #8 in the theme functions.php file or a custom functionality plugin.