Pre-Requisites
- Gravity Forms and Gravity Forms Stripe Add-On installed
- SSL Certificate Installed and Configured
- A Stripe account
- A Stripe account login with user role of “owner” or “administrator”
Stripe Settings
The Stripe Settings allow you to connect and authenticate with your Stripe account, as well as make choices about how you collect payment information. Additionally, this screen allows you to set up webhooks, which are used to communicate events from Stripe back to your Gravity Forms environment.
Navigate to your Stripe Add-On Settings page:
- Log into your WordPress admin dashboard.
- On the left side navigation menu, hover over Forms and click on Settings.
- Click the Stripe tab.
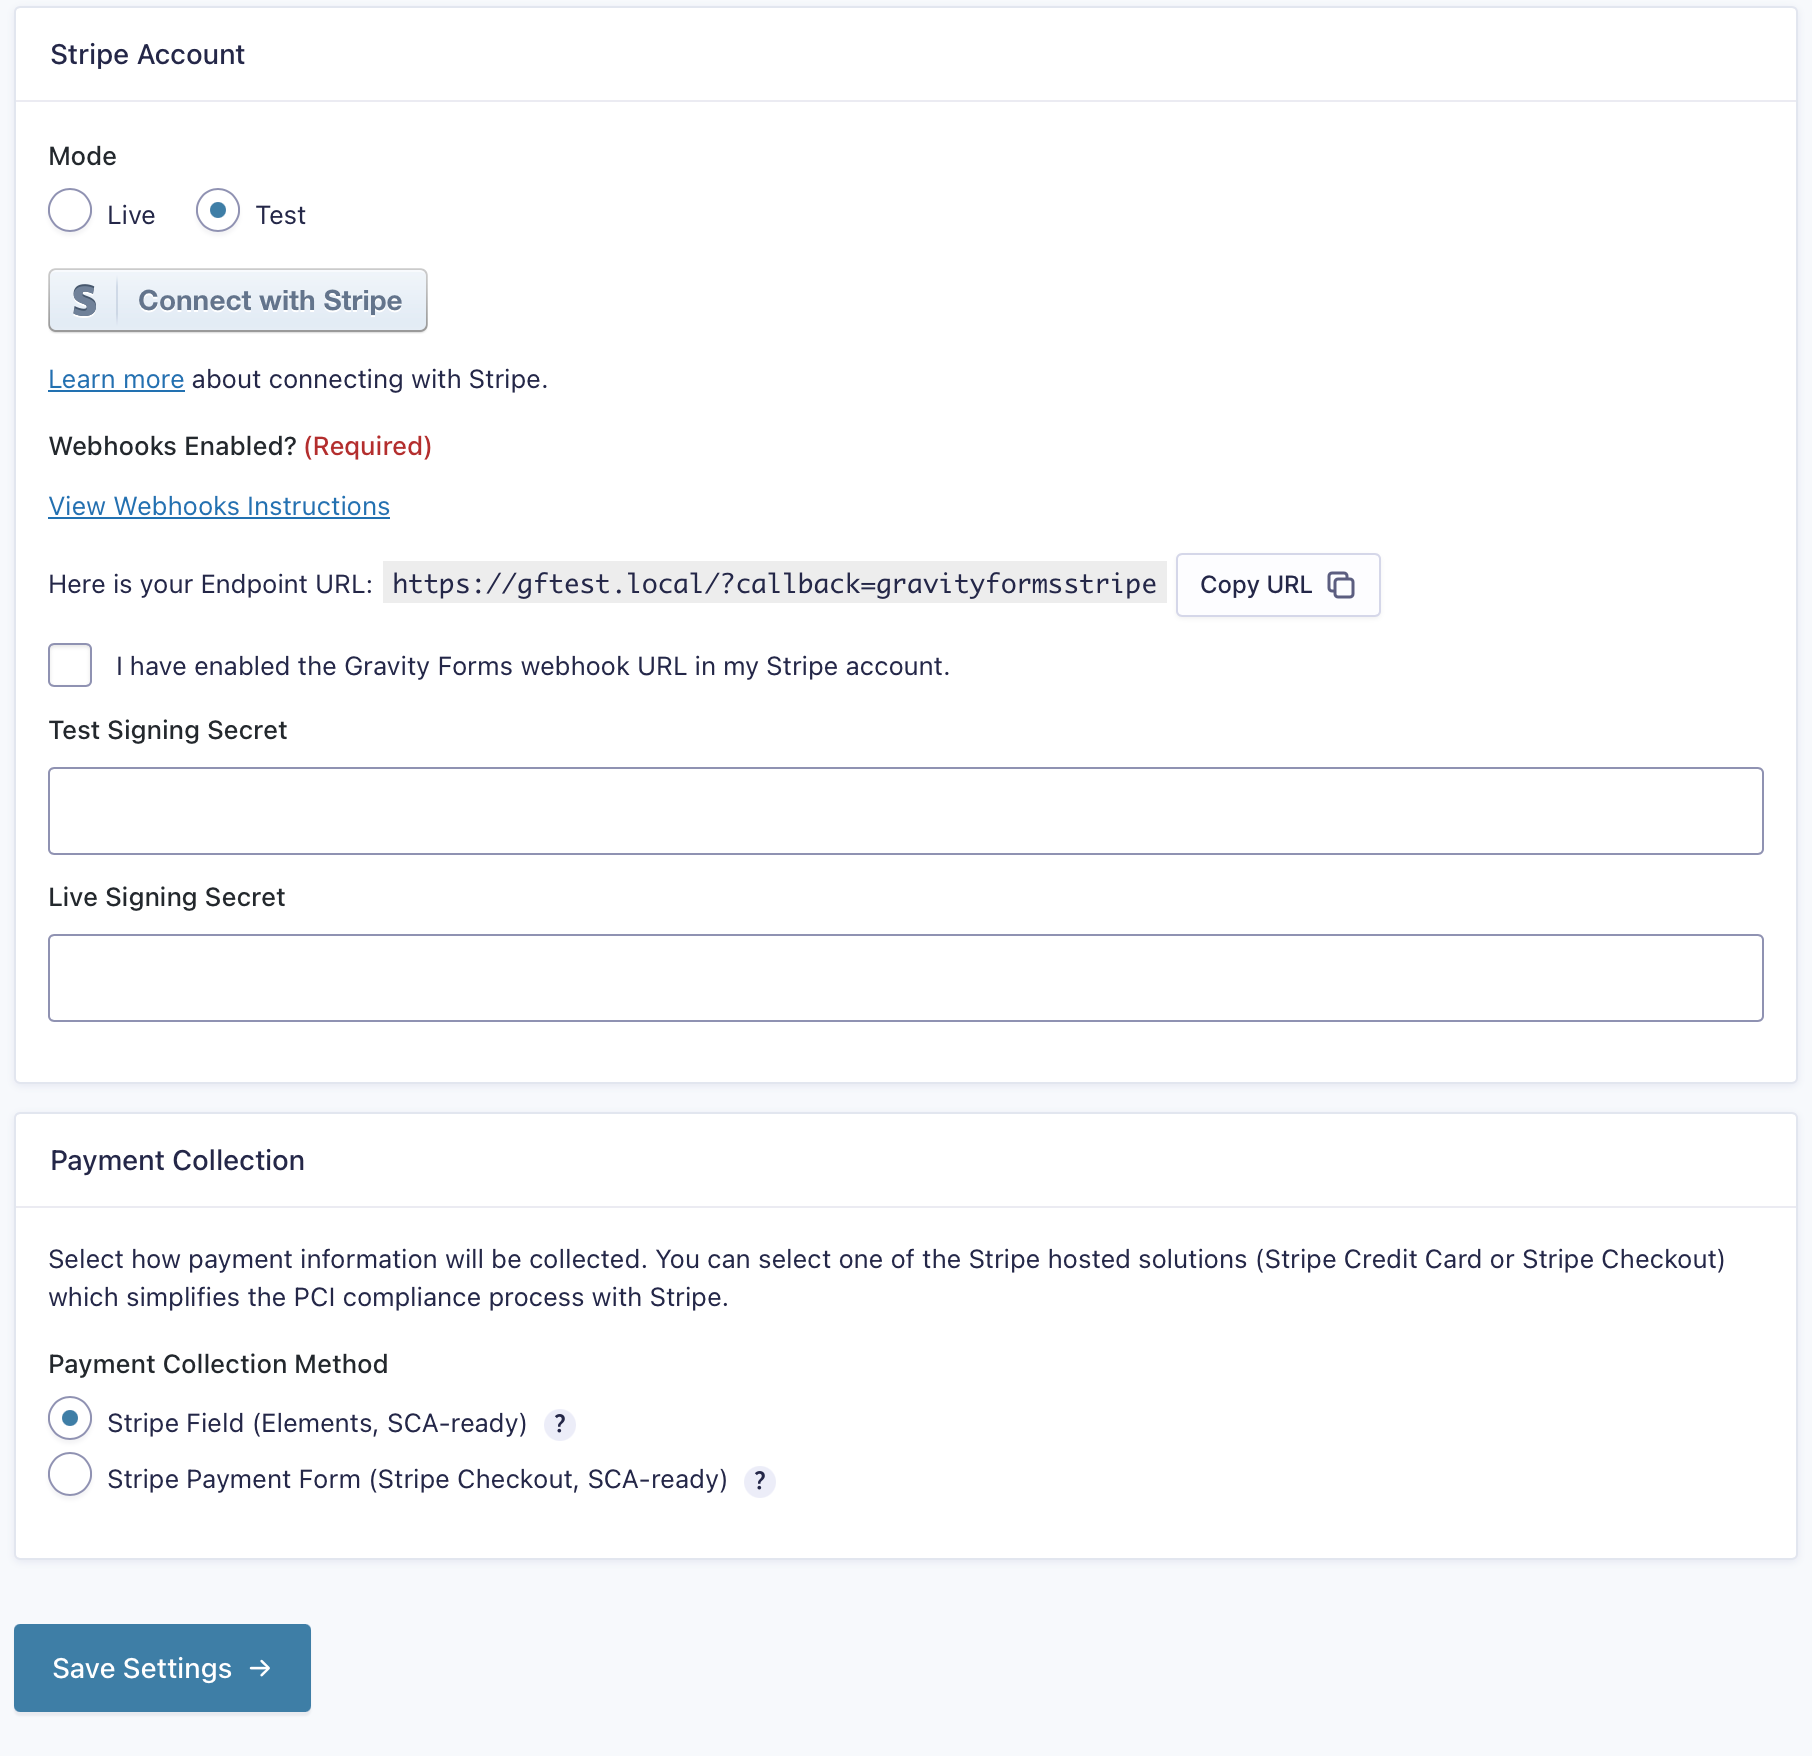
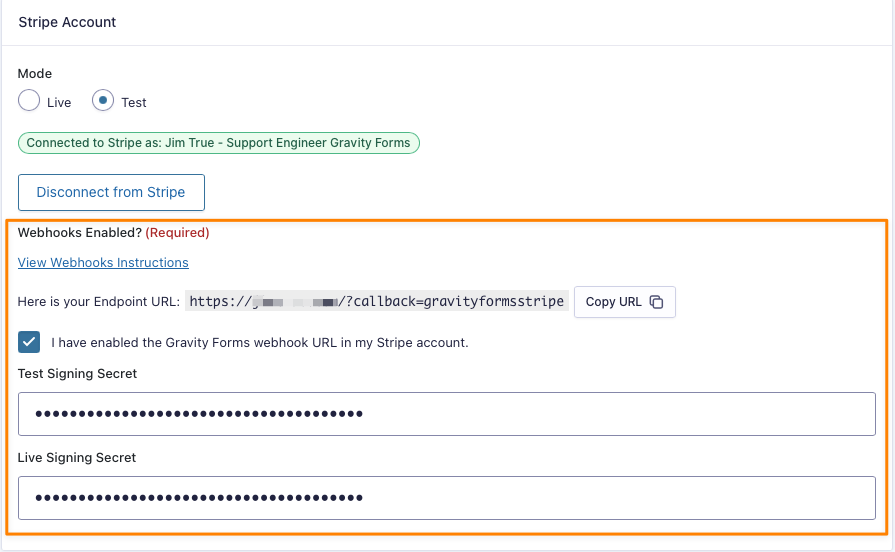
Mode
Mode specifies the environment to which you want to connect your form submissions. Choosing Live will connect to the environment that initiates real transactions against your Stripe account. Choosing Test will run the form entry into your Stripe test environment for review, but no actual charges will occur.
Review the process described in this help guide for full instructions on connecting to a live or test environment.
Webhooks
You are required to have Webhooks enabled in your Live environment (and Test environment if you are using it). Stripe communicates with your website throughout the transactional process of collecting payments and creating subscriptions, and it uses the Webhook endpoints you create to listen to the transactional events from Stripe. The filter gform_stripe_webhook defines what events are listened for by the Stripe Add-on and how to add support for listening to additional events from Stripe.
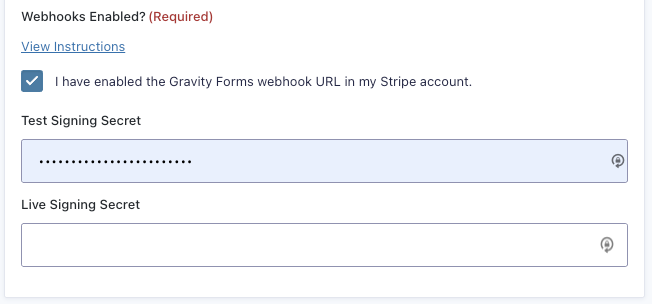
Use the instructions below to complete the Live Signing Secret and Test Signing Secret and confirm that Webhooks are enabled in the Stripe Settings screen. The View Webhooks Instructions links to this document and provides the Endpoint URL from your website. The Mode you select (Live or Test) will determine which webhook you are configuring and whether you are creating a Test Signing Secret or a Live Signing Secret.
Quick Start for Adding Webhooks
Do you already know what you’re doing? Here’s the quick links to Add Viewpoints in Live and in Test along with links to view all Endpoints in Live and Test. Remember when you collect the Signing Secret from Stripe the LIVE Stripe account provides Live Signing Secrets; the TEST provides Test Signing Secret.
| Quick Links | Live Mode | Test Mode |
|---|---|---|
| Add Webhook Endpoint | Add Webhook in Live | Add Webhook in Test |
| All Webhook Endpoints | View Endpoints in Live | View Endpoints in Test |
Creating a Webhook Endpoint in Live
Log in to your Stripe account Workbench and select the Create an event destination option:
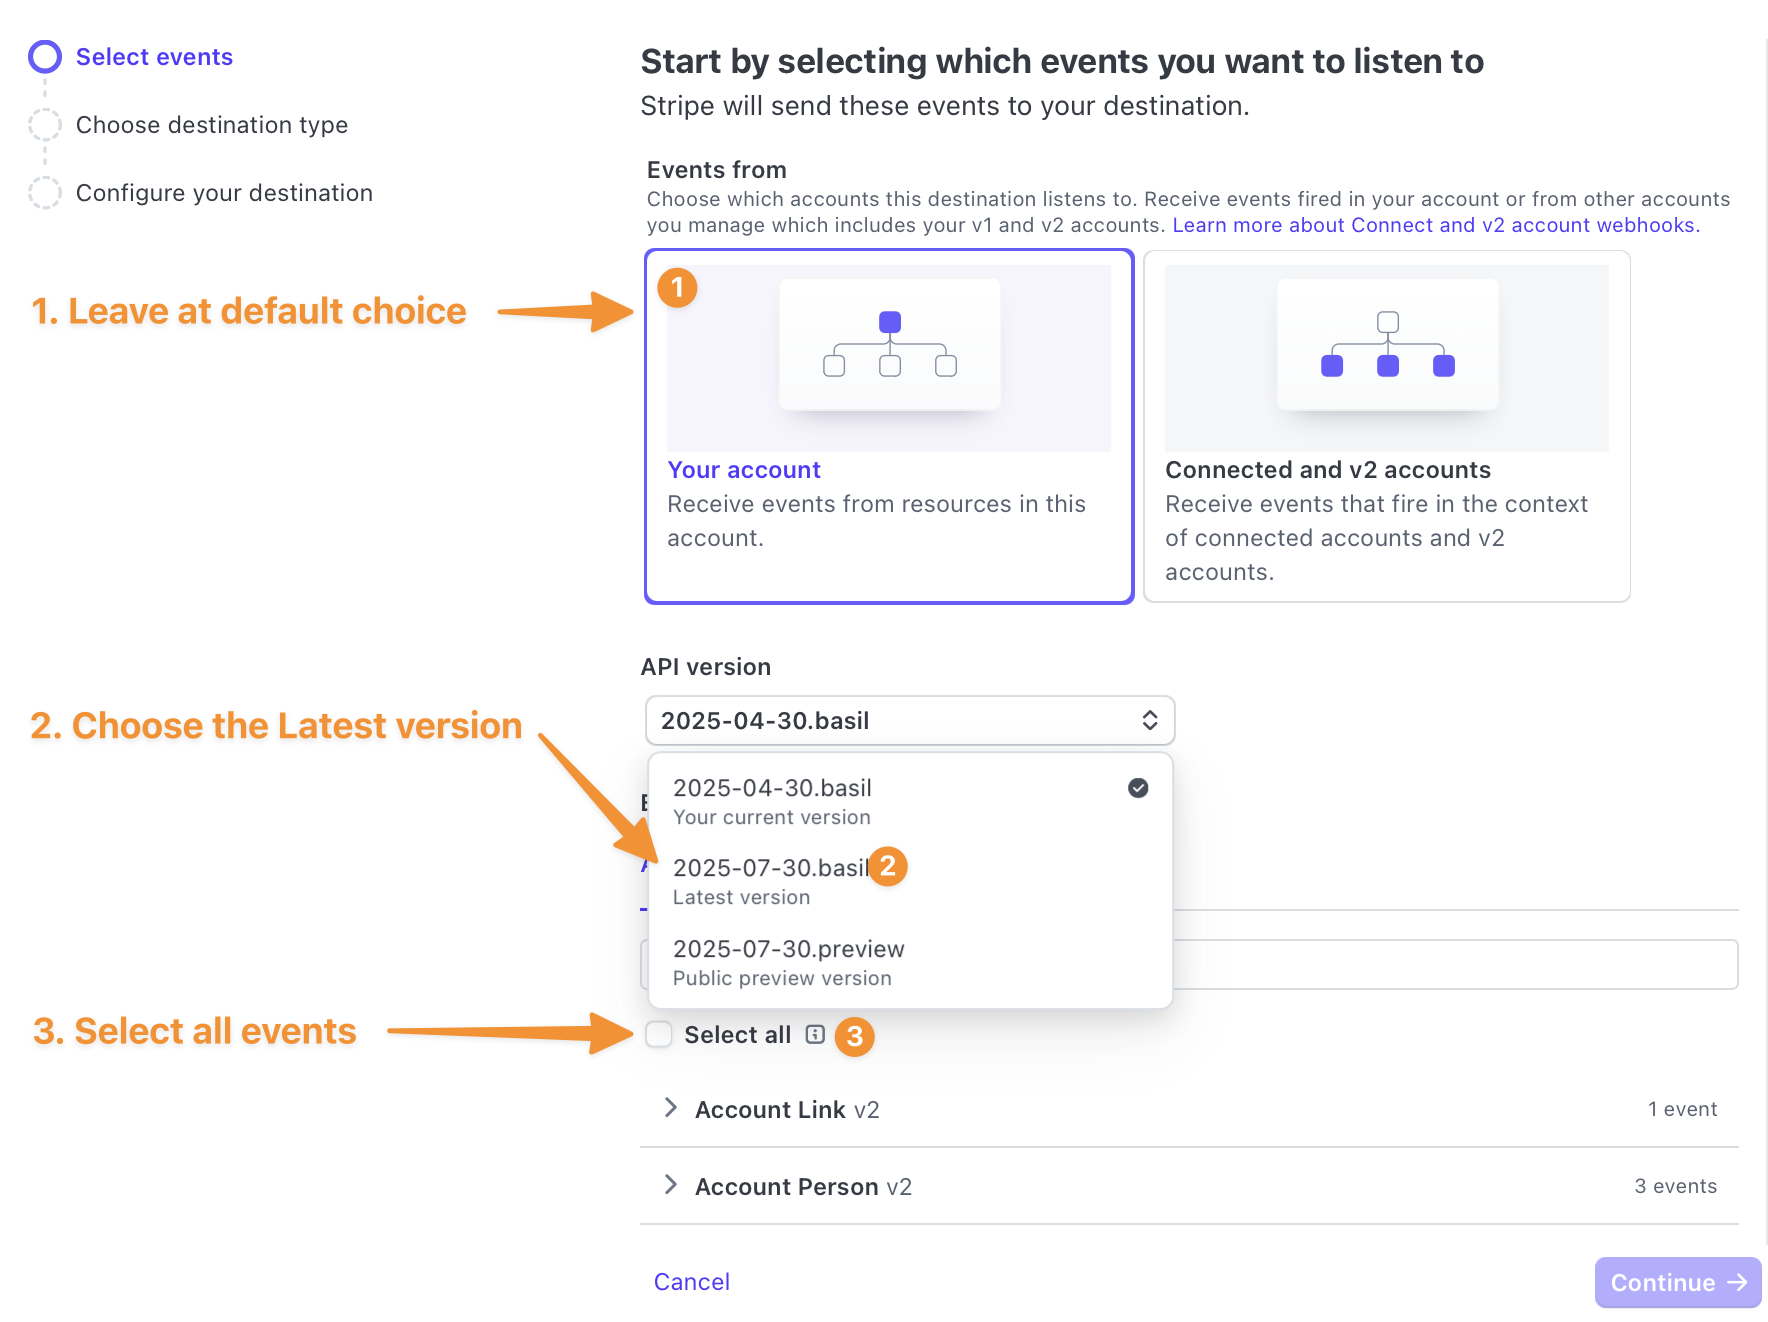
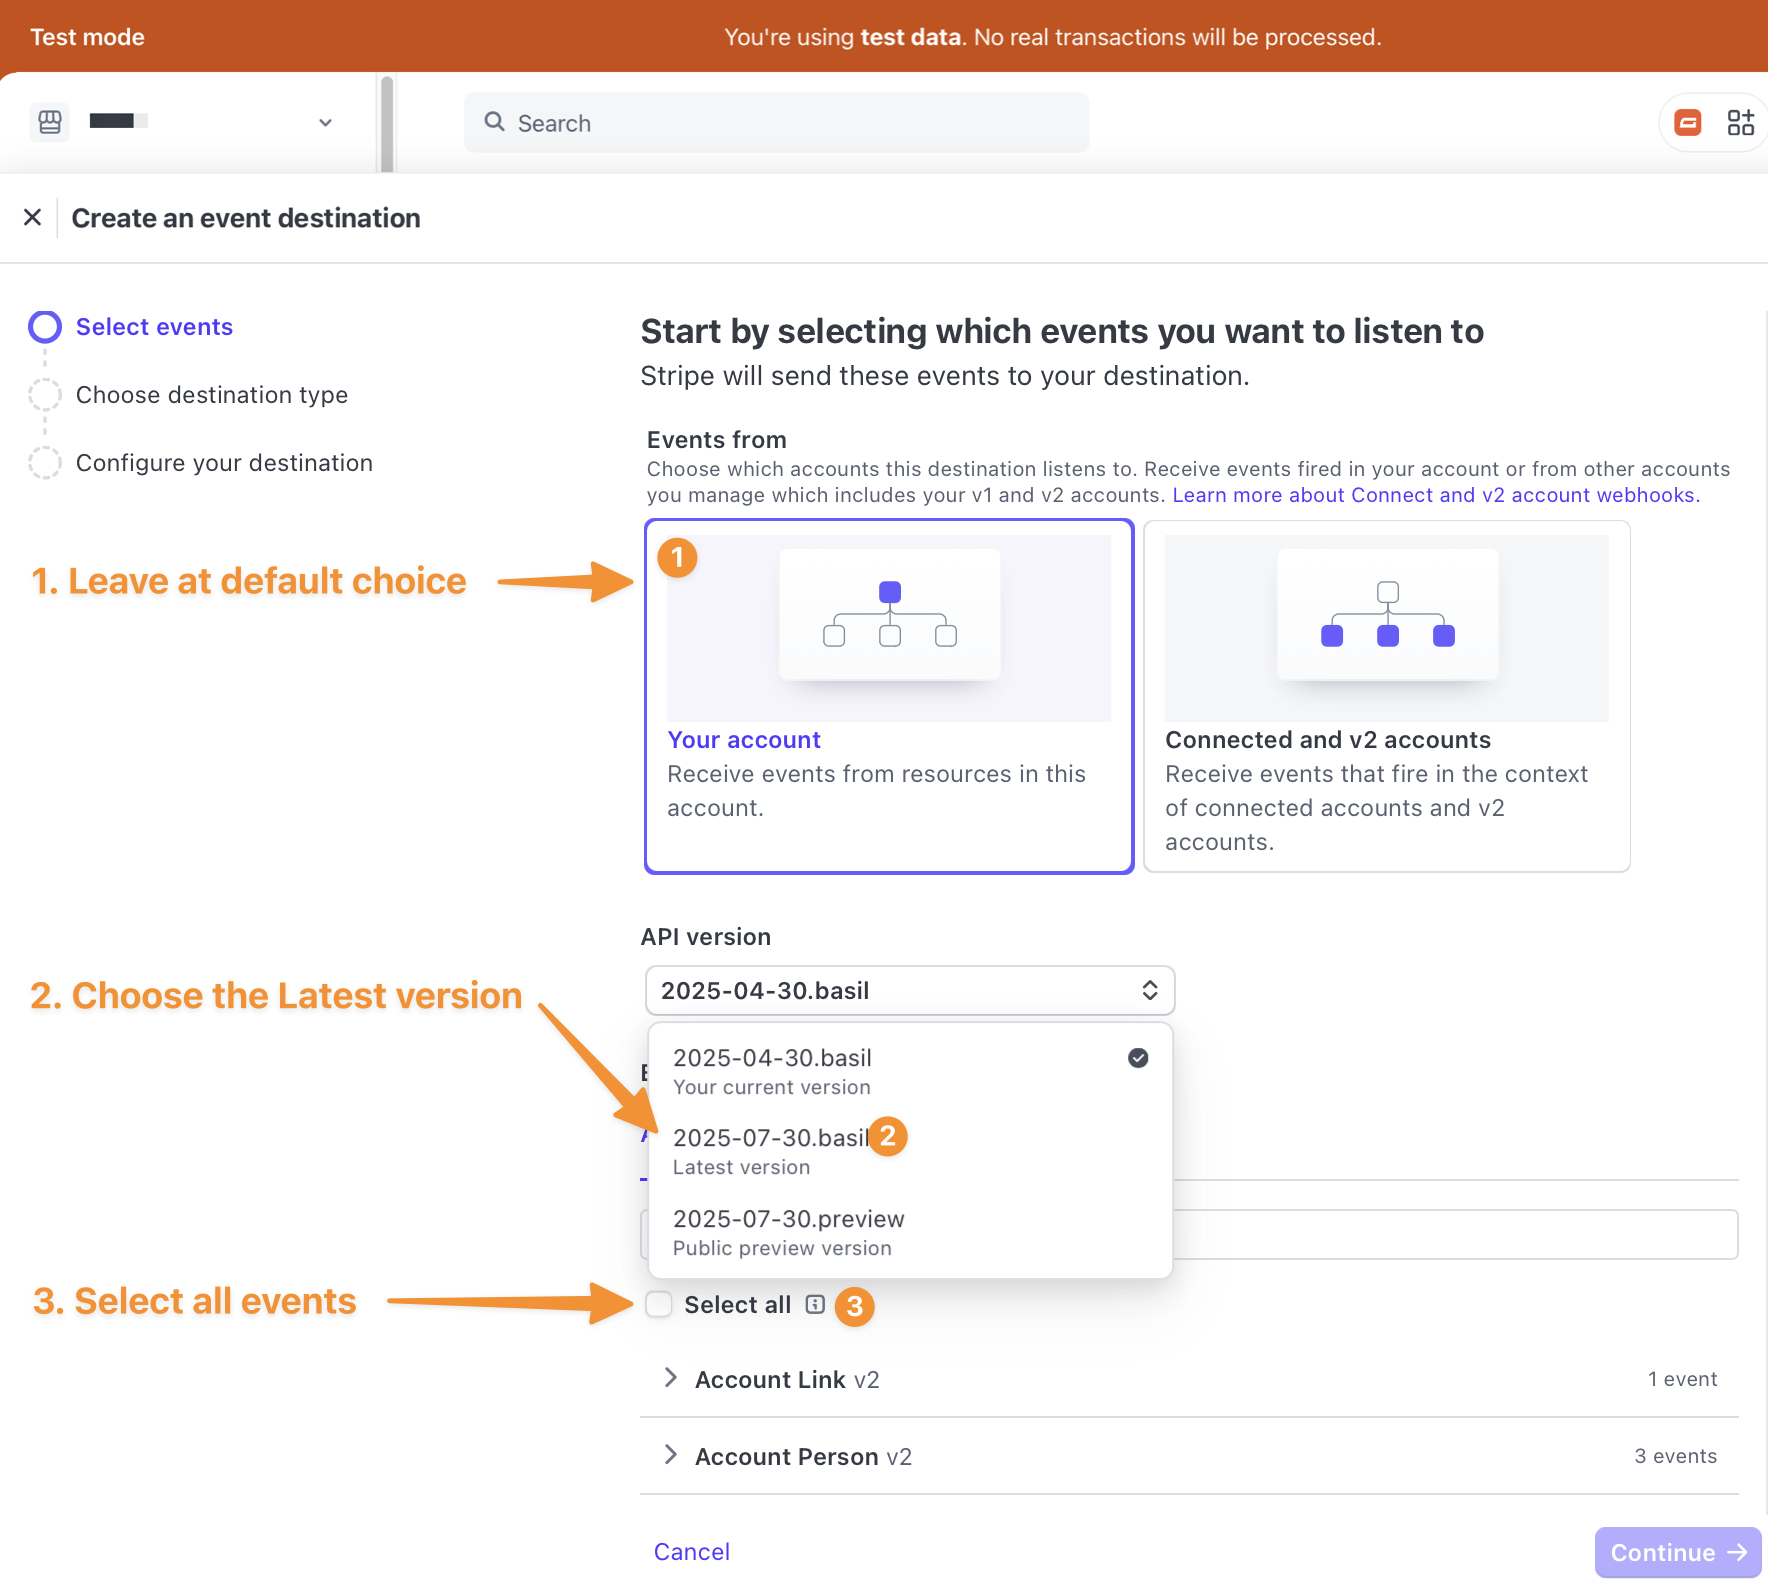
Under Select Events, Your account will be selected as the default:
- For Events from select Your account, which is the default choice.
- For API Version, select the latest API version.
- For Events, you have the option to select specific events or all events. Click the checkbox to Select all.
You will receive a warning that “Selecting all events may increase latency and cause poor performance.” We recommend “selecting all” because Stripe often updates or changes their webhook events, which may result in specific selections that worked previously no longer effectively communicating with the Stripe Add-On. If you choose not to “select all”, we recommend you review the performance in a sandbox environment regularly, and at least with each update.
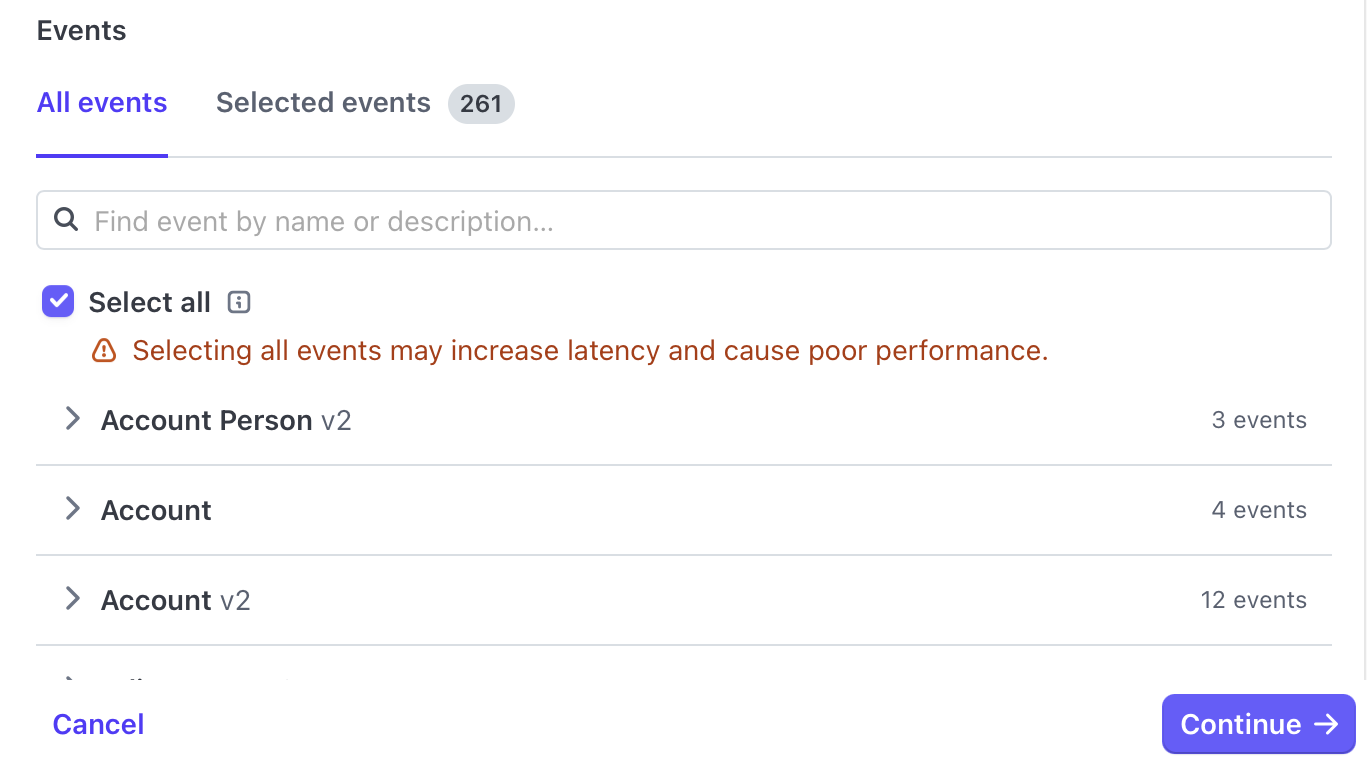
You can also select individual events in this list, but at a minimum, you must select all the events from the gform_stripe_webhooks article. This list is subject to change.
Click Continue to confirm Event selection.
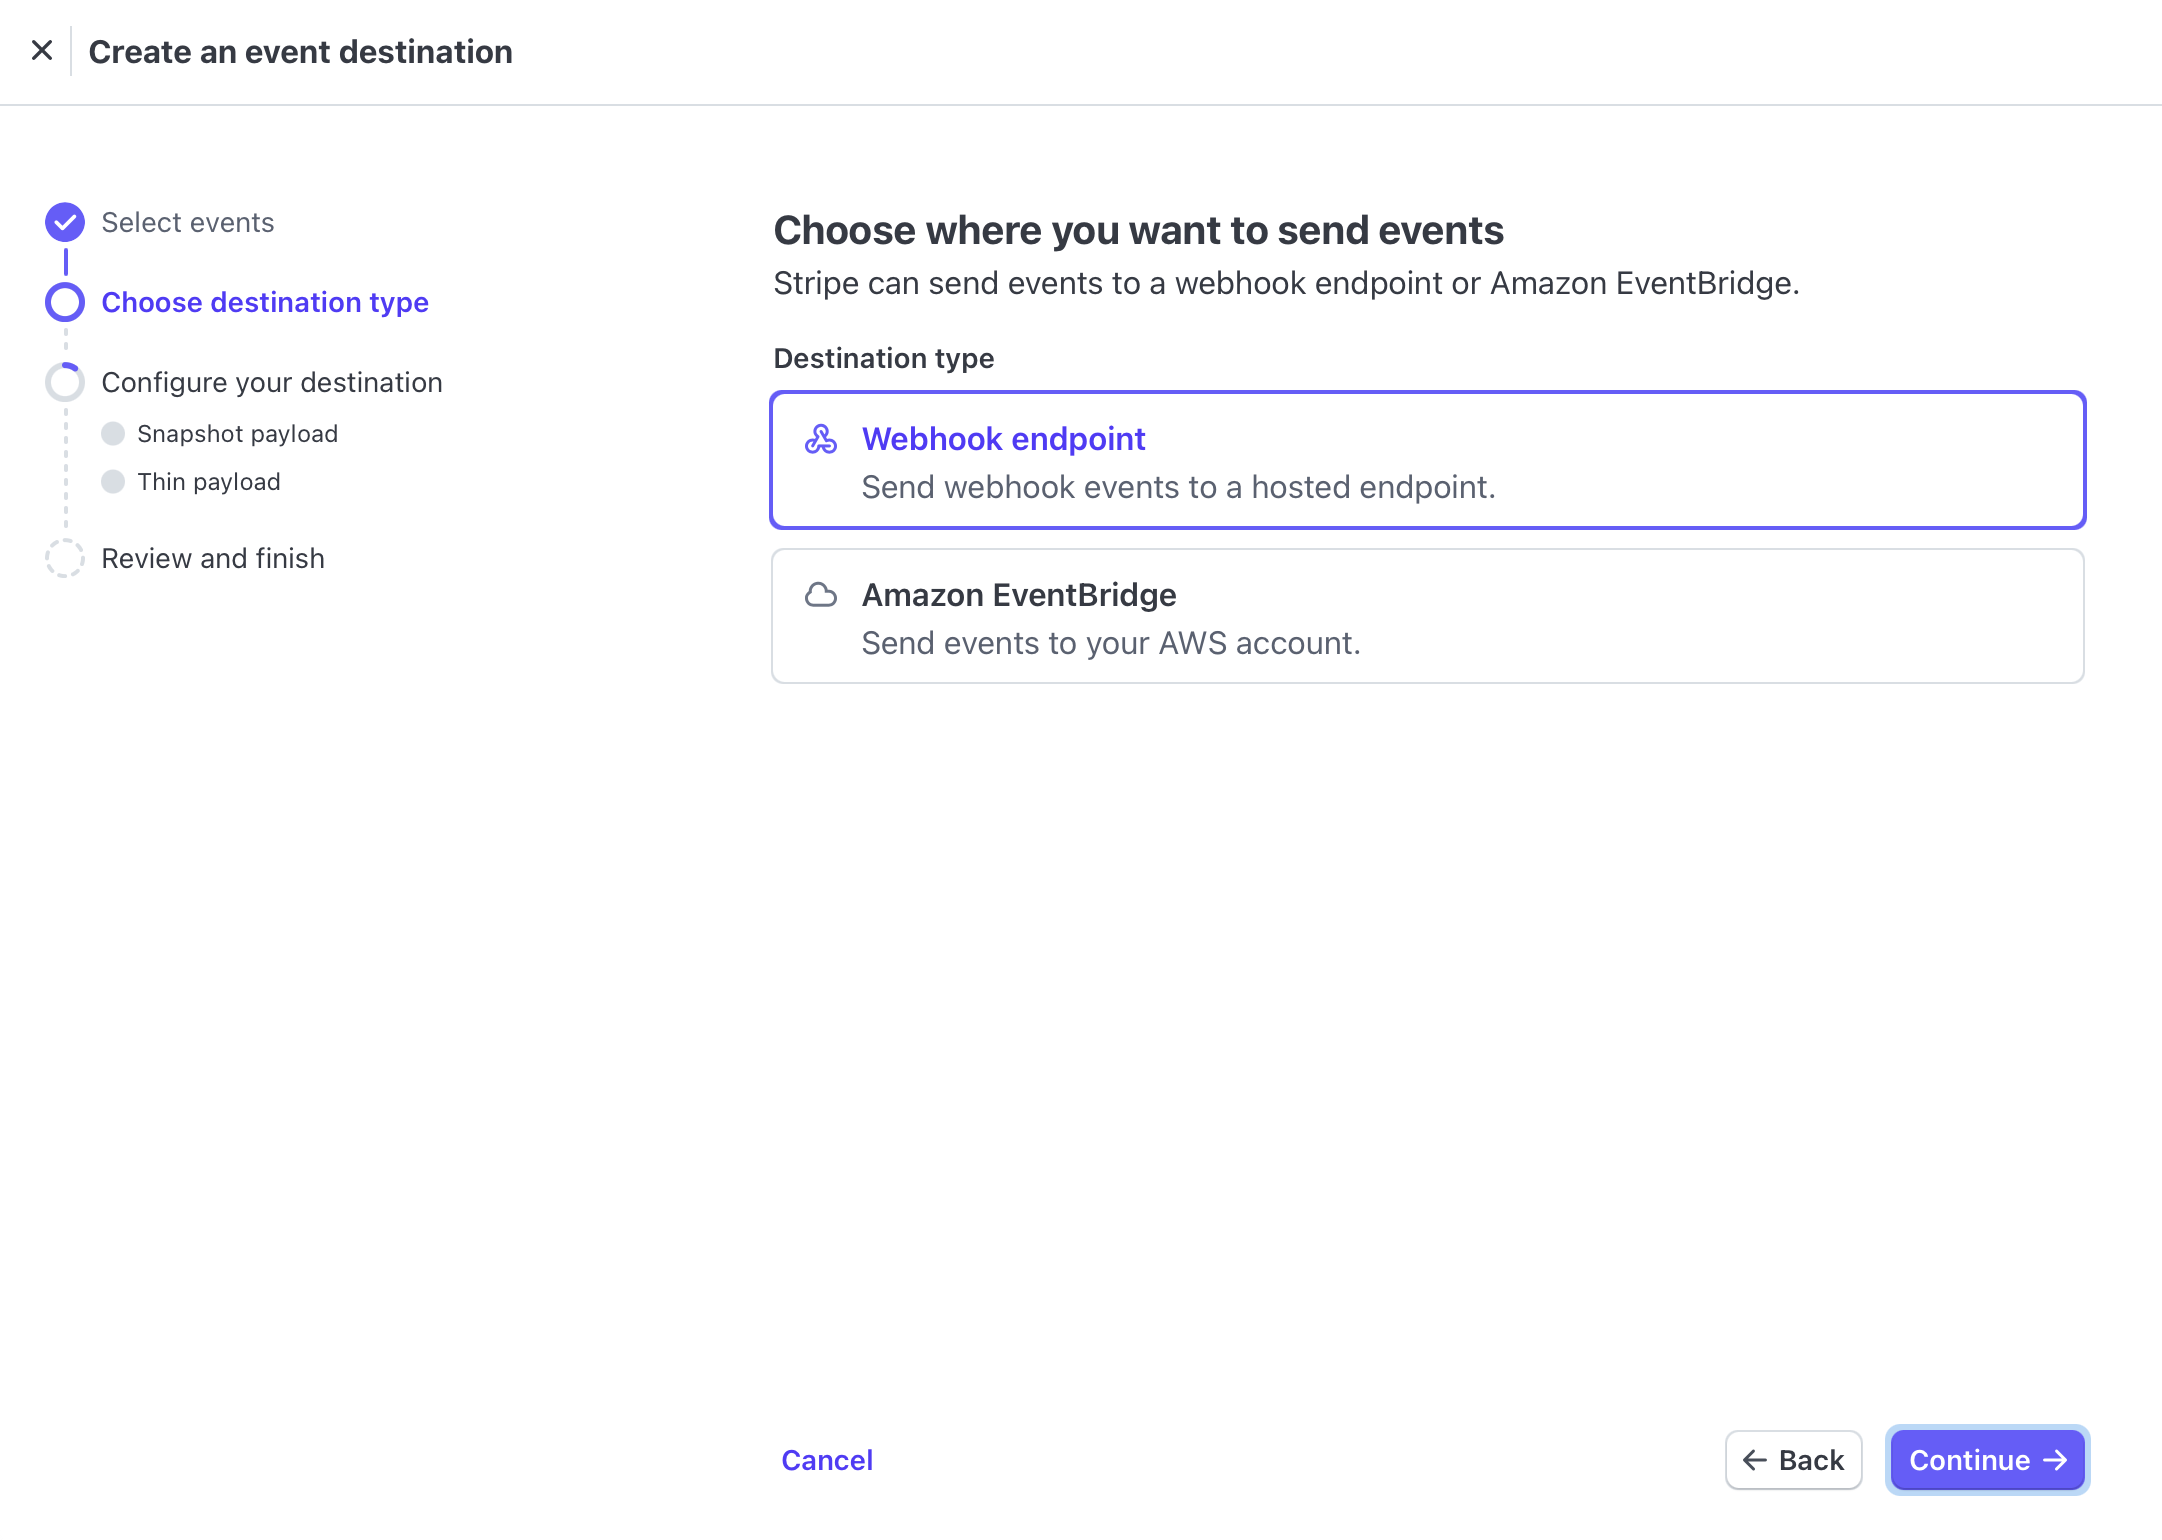
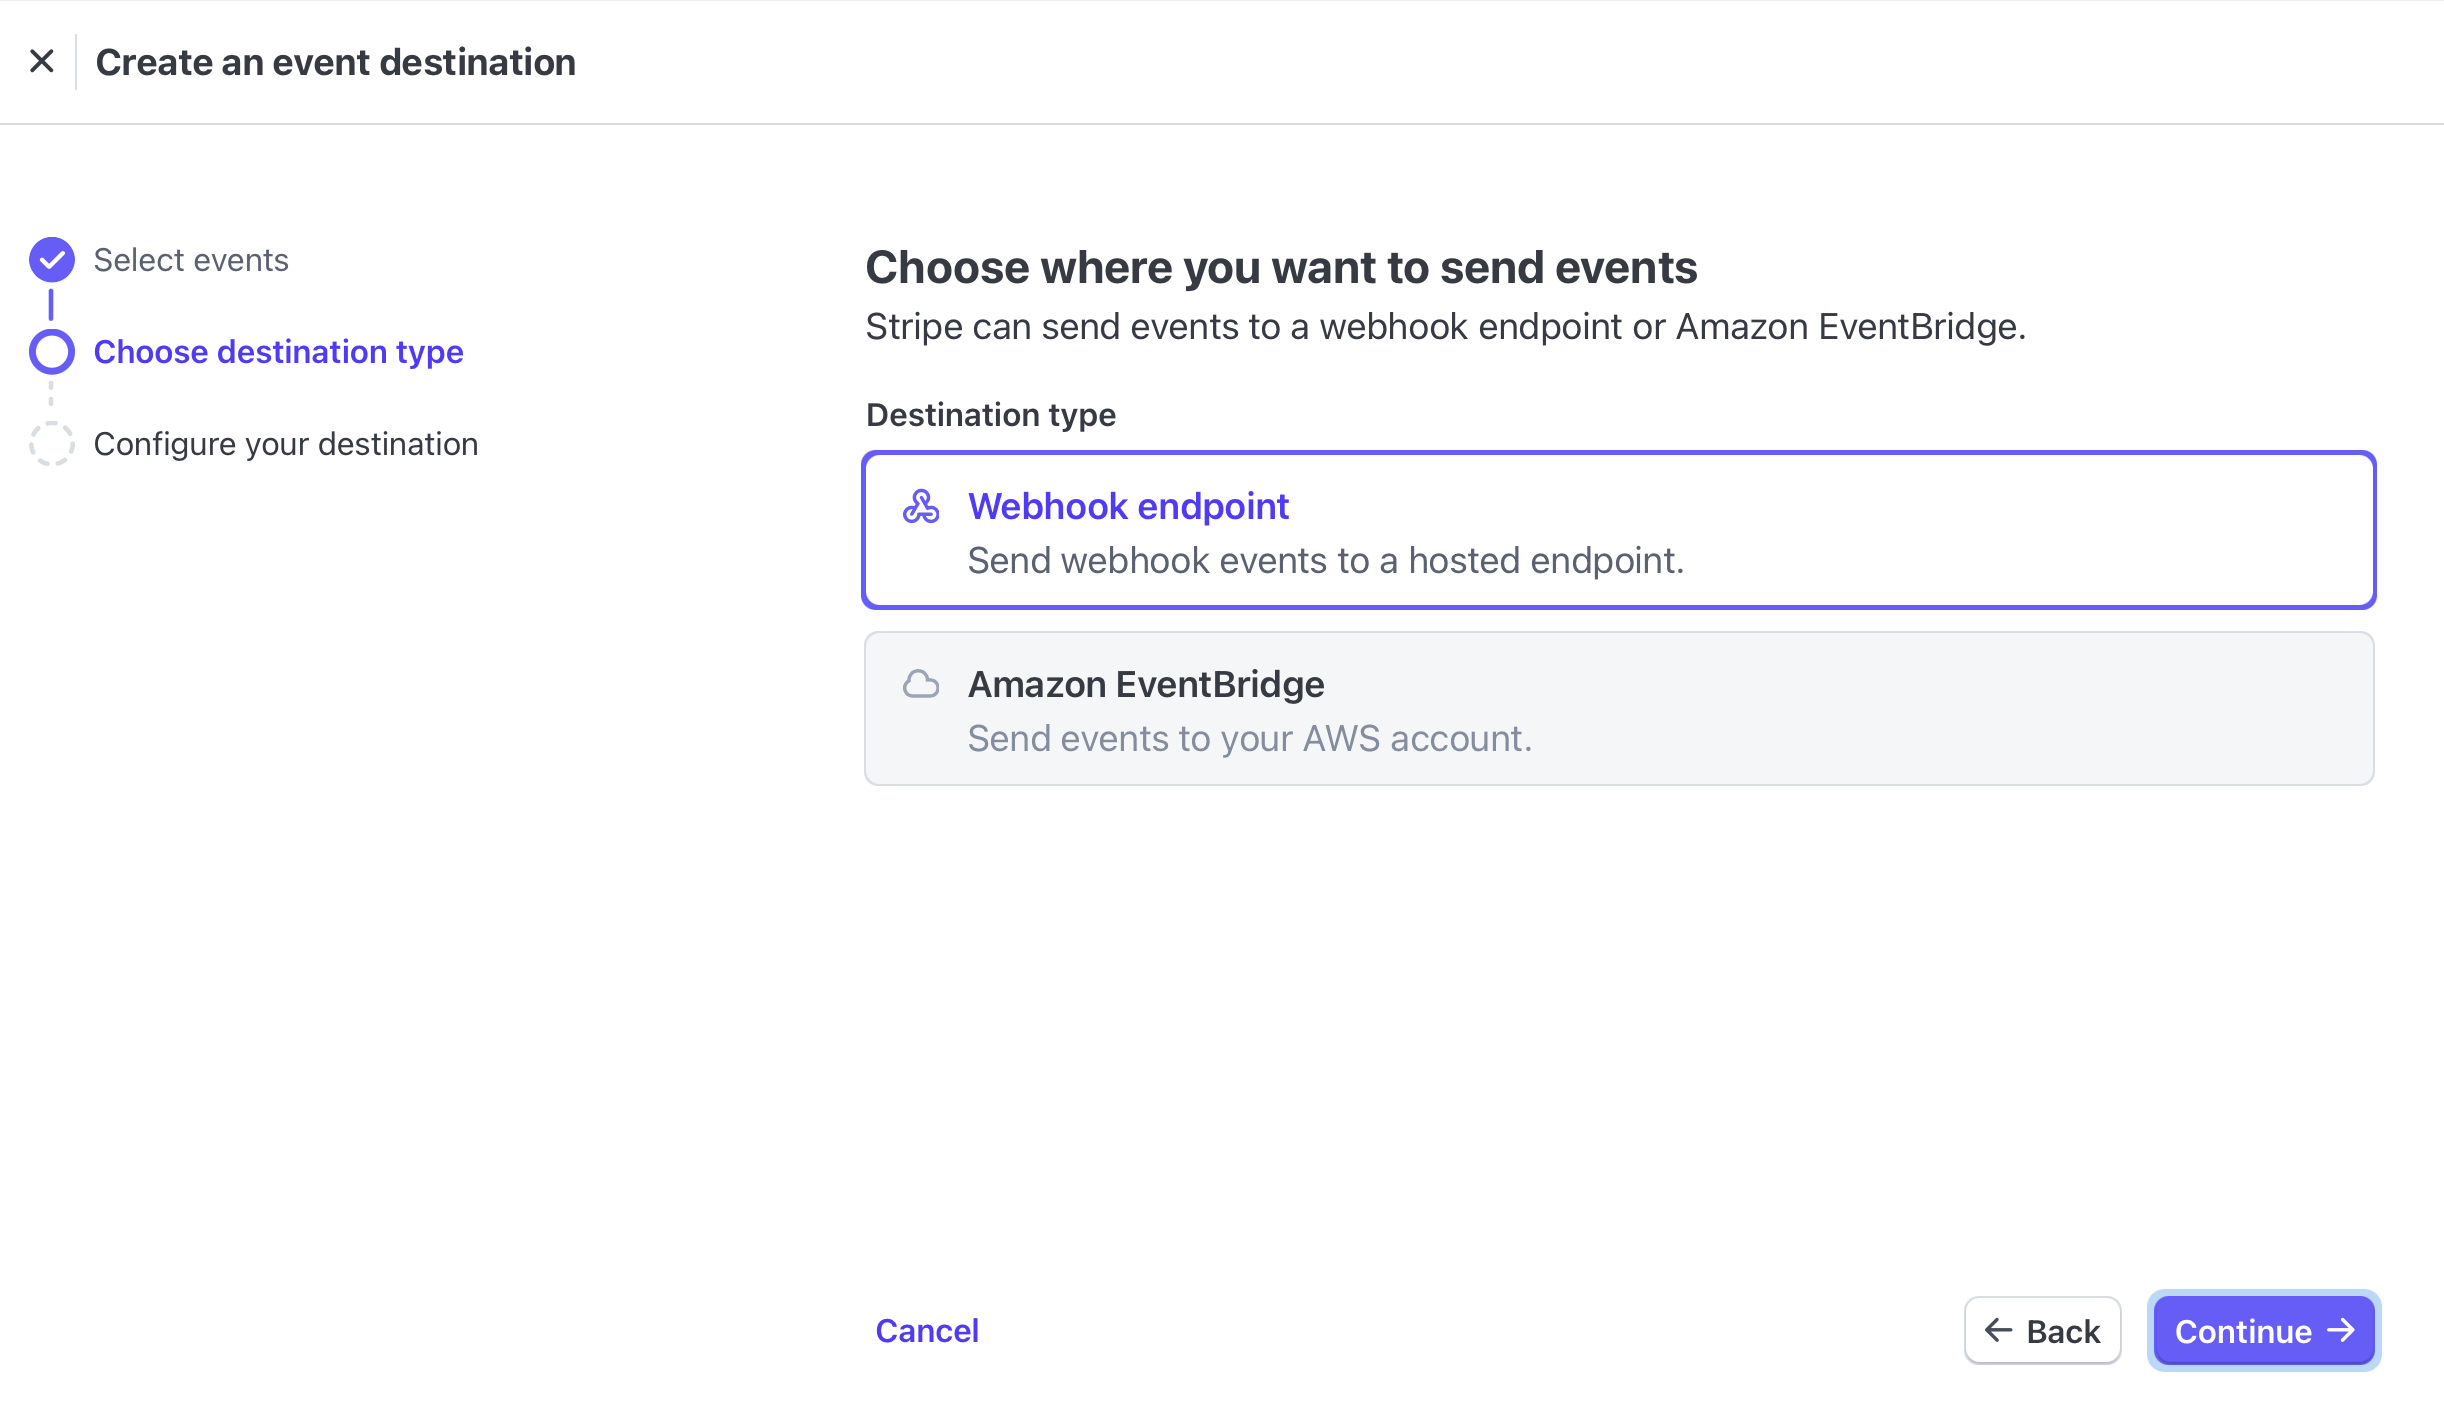
Under Choose destination type, select Webhook endpoint and click Continue.
Under Configure your destination, click Continue at the Payload Style Notice.

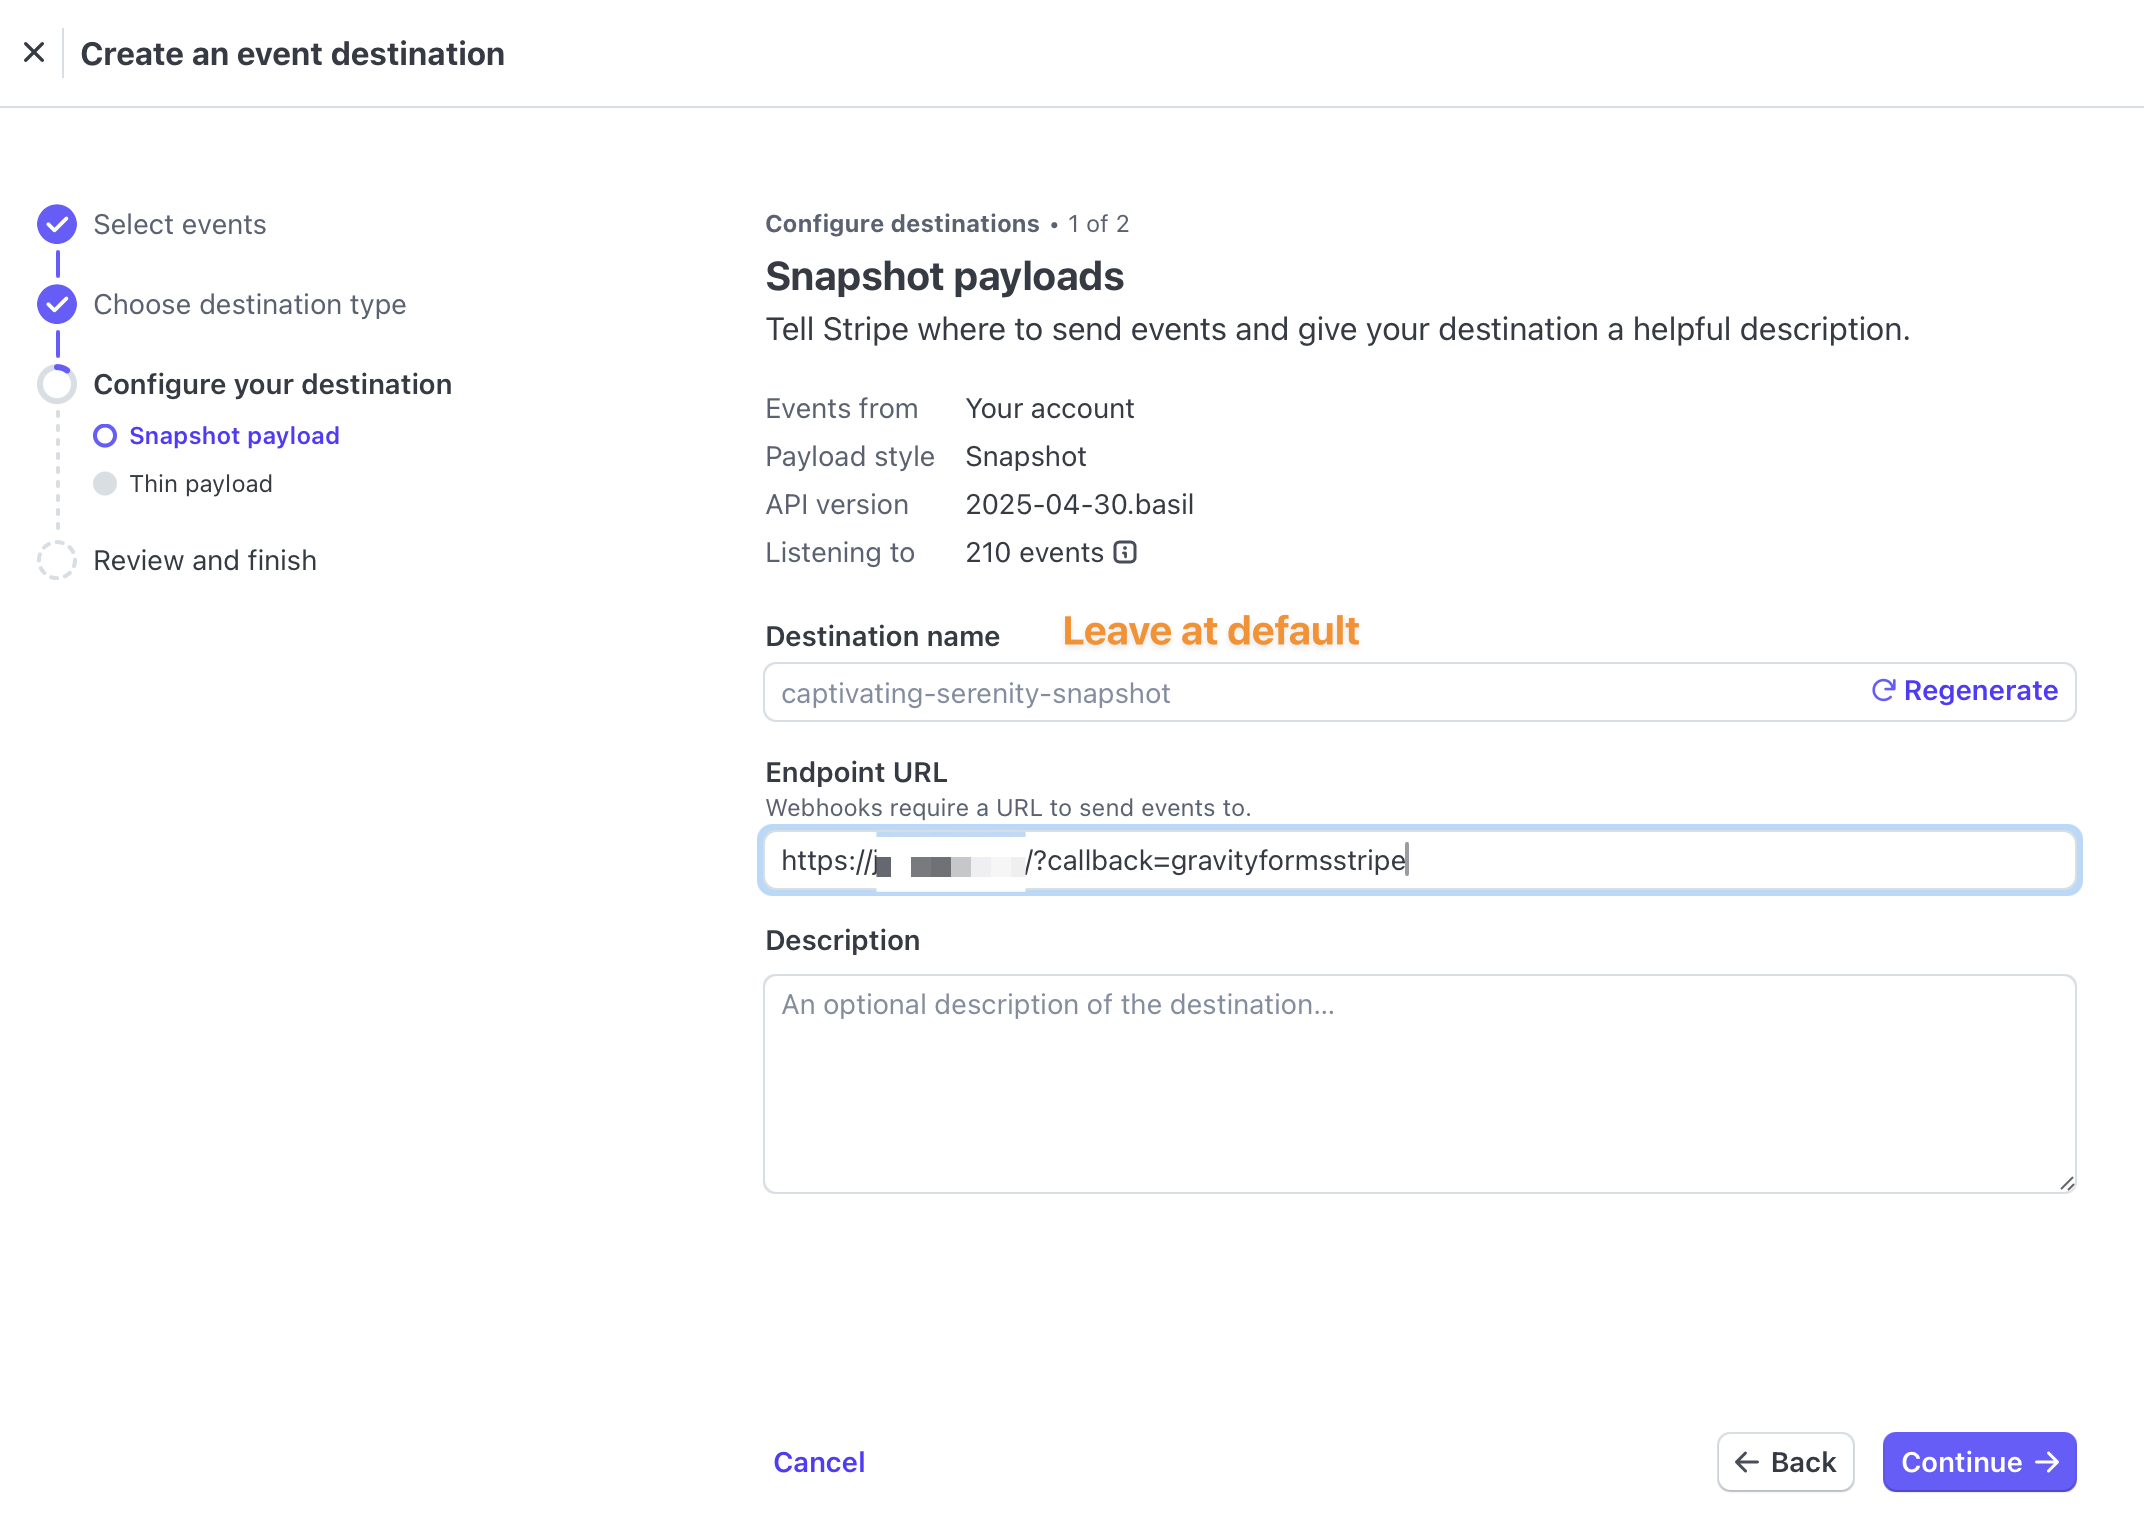
Add your Endpoint URL to the Snapshot Payload and Thin Payload configuration screens.
The Endpoint URL for your website will be provided under the View Webhooks instructions under the Stripe Settings screen. There is a useful button for Copy URL which will copy the Endpoint URL to your clipboard so it can be easily pasted into the screens at Stripe.

Note: In versions of Stripe prior to 6.0, the link to the Endpoint URL was included in the View Webhooks Instructions modal.
The Endpoint URL is determined by your website url, i.e https://your_website.com/, followed by ?callback=gravityformsstripe
As an example, if your website was https://www.example.com, you would use https://www.example.com/?callback=gravityformsstripe
Under Snapshot payloads, leave the Destination name at the default value and input the Endpoint URL and click Continue.
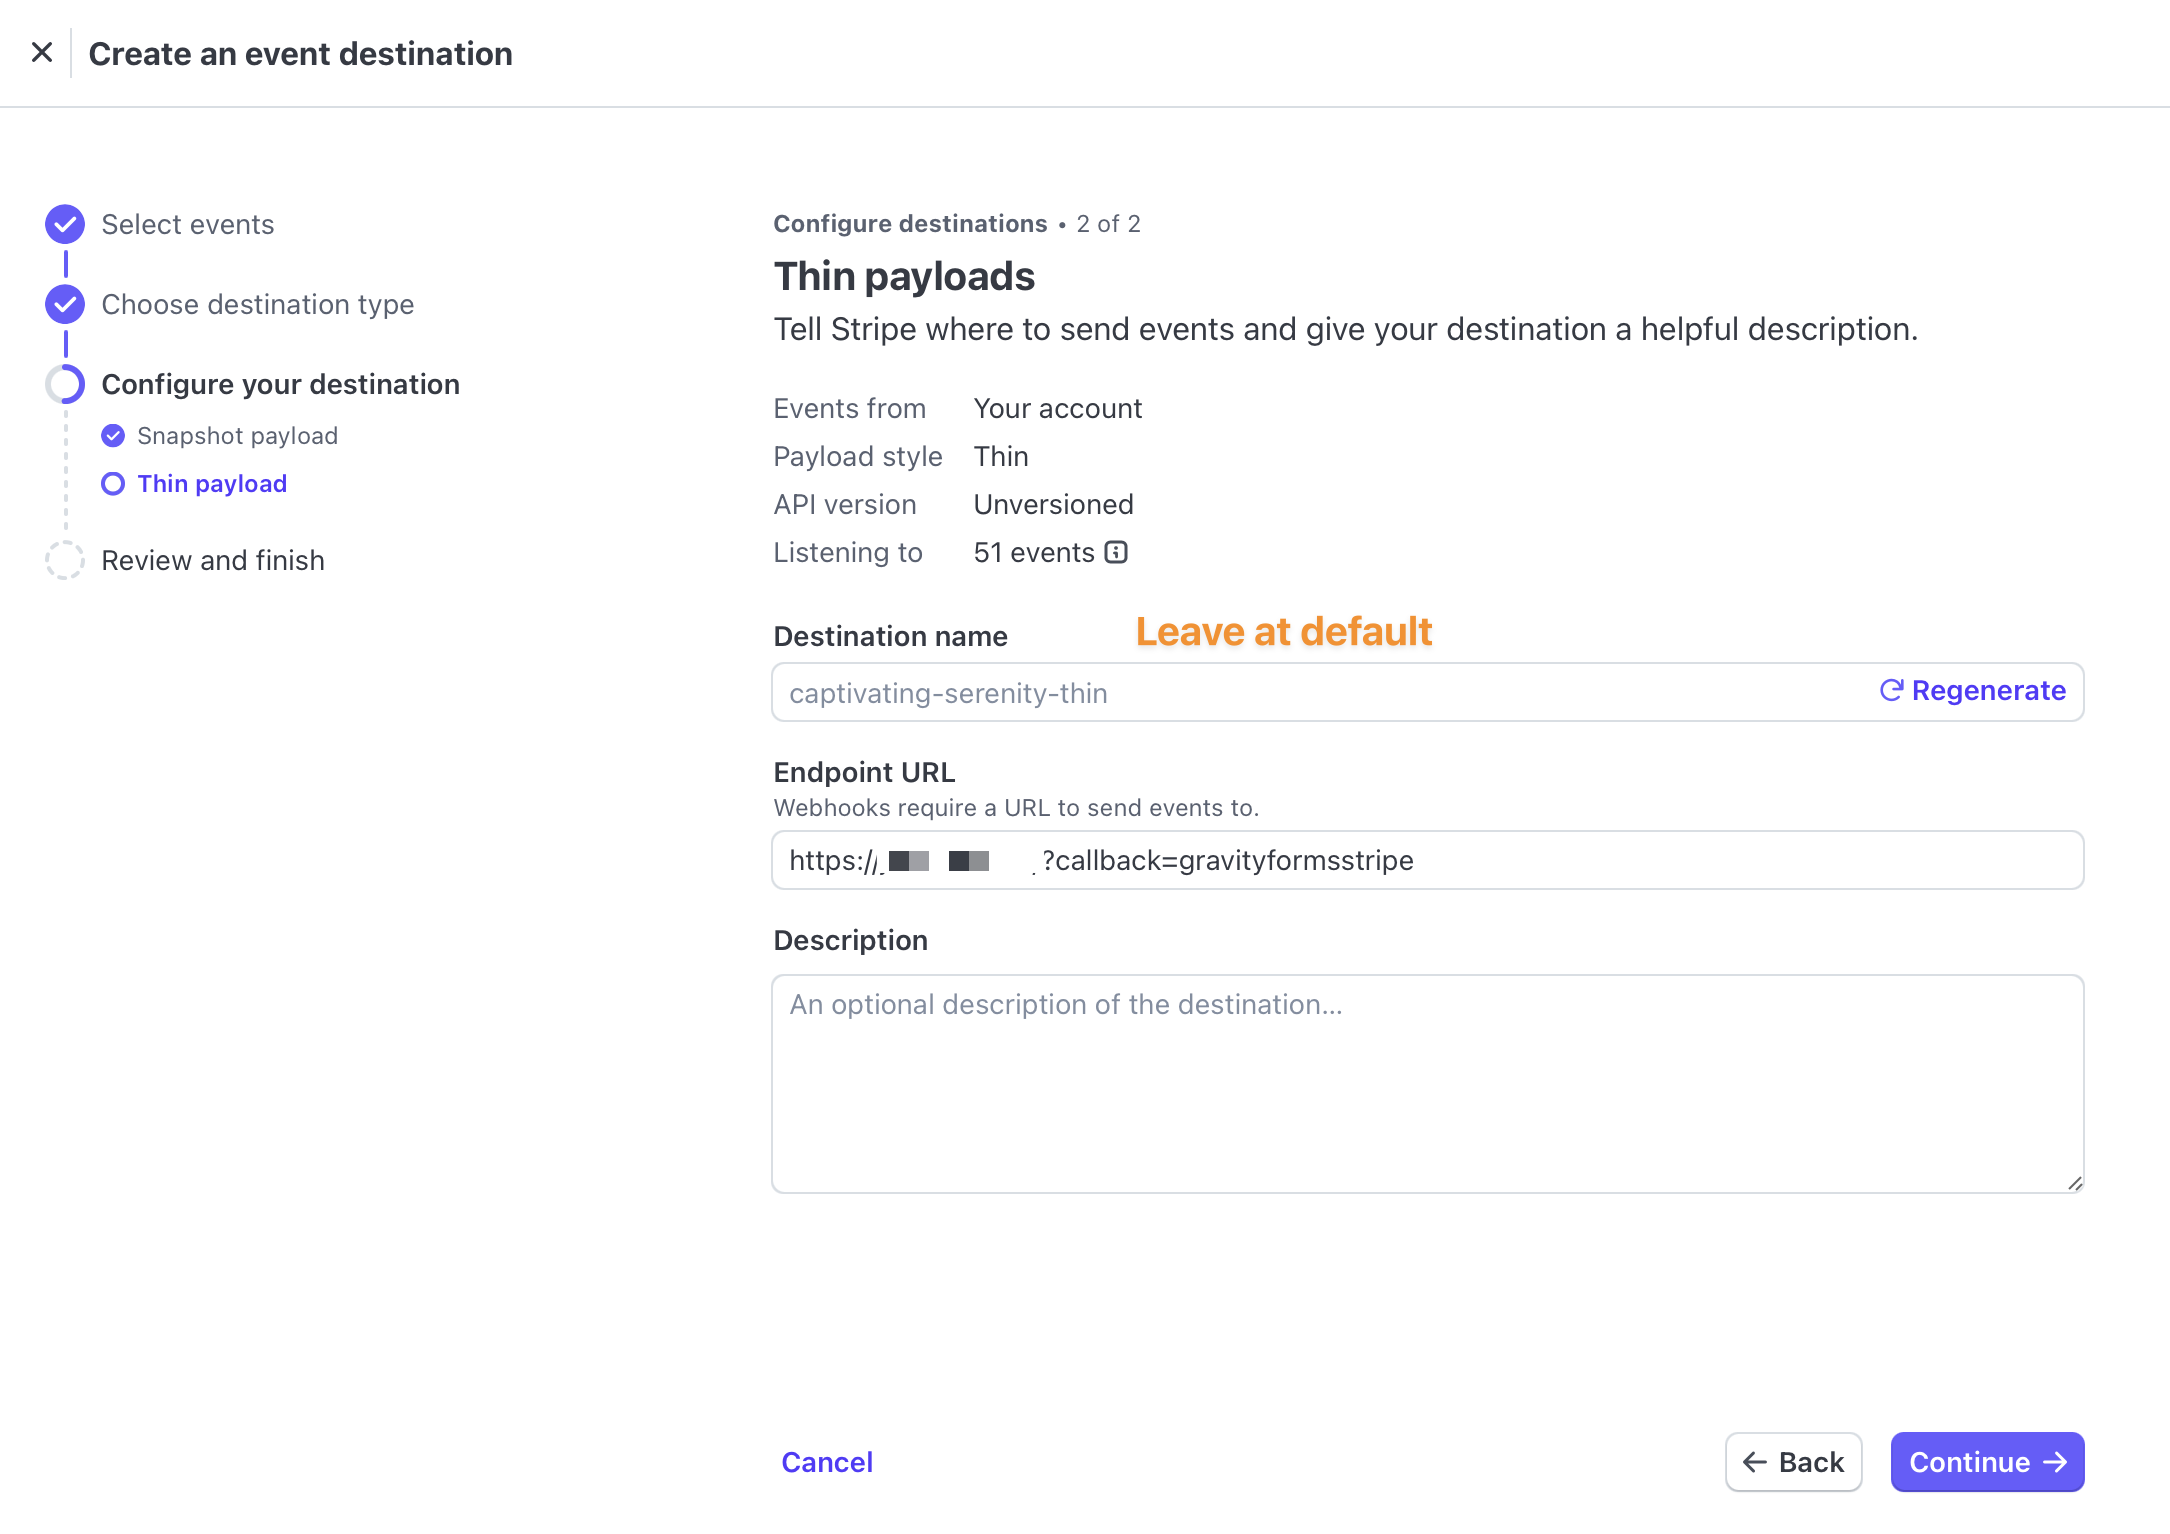
Under Thin payloads, leave the Destination name at the default value and input the Endpoint URL and click Continue.
Under Review and Finish, confirm the settings for both destinations and click Add Destination.

After clicking Add Destination, you will be provided a Signing Secret for both Payloads destinations. Copy the Signing Secret using the clipboard icon on this confirmation screen
Click Done at the confirmation screen, ignoring the Signing Secret from the Thin payload as this is not used by Gravity Forms at this time.
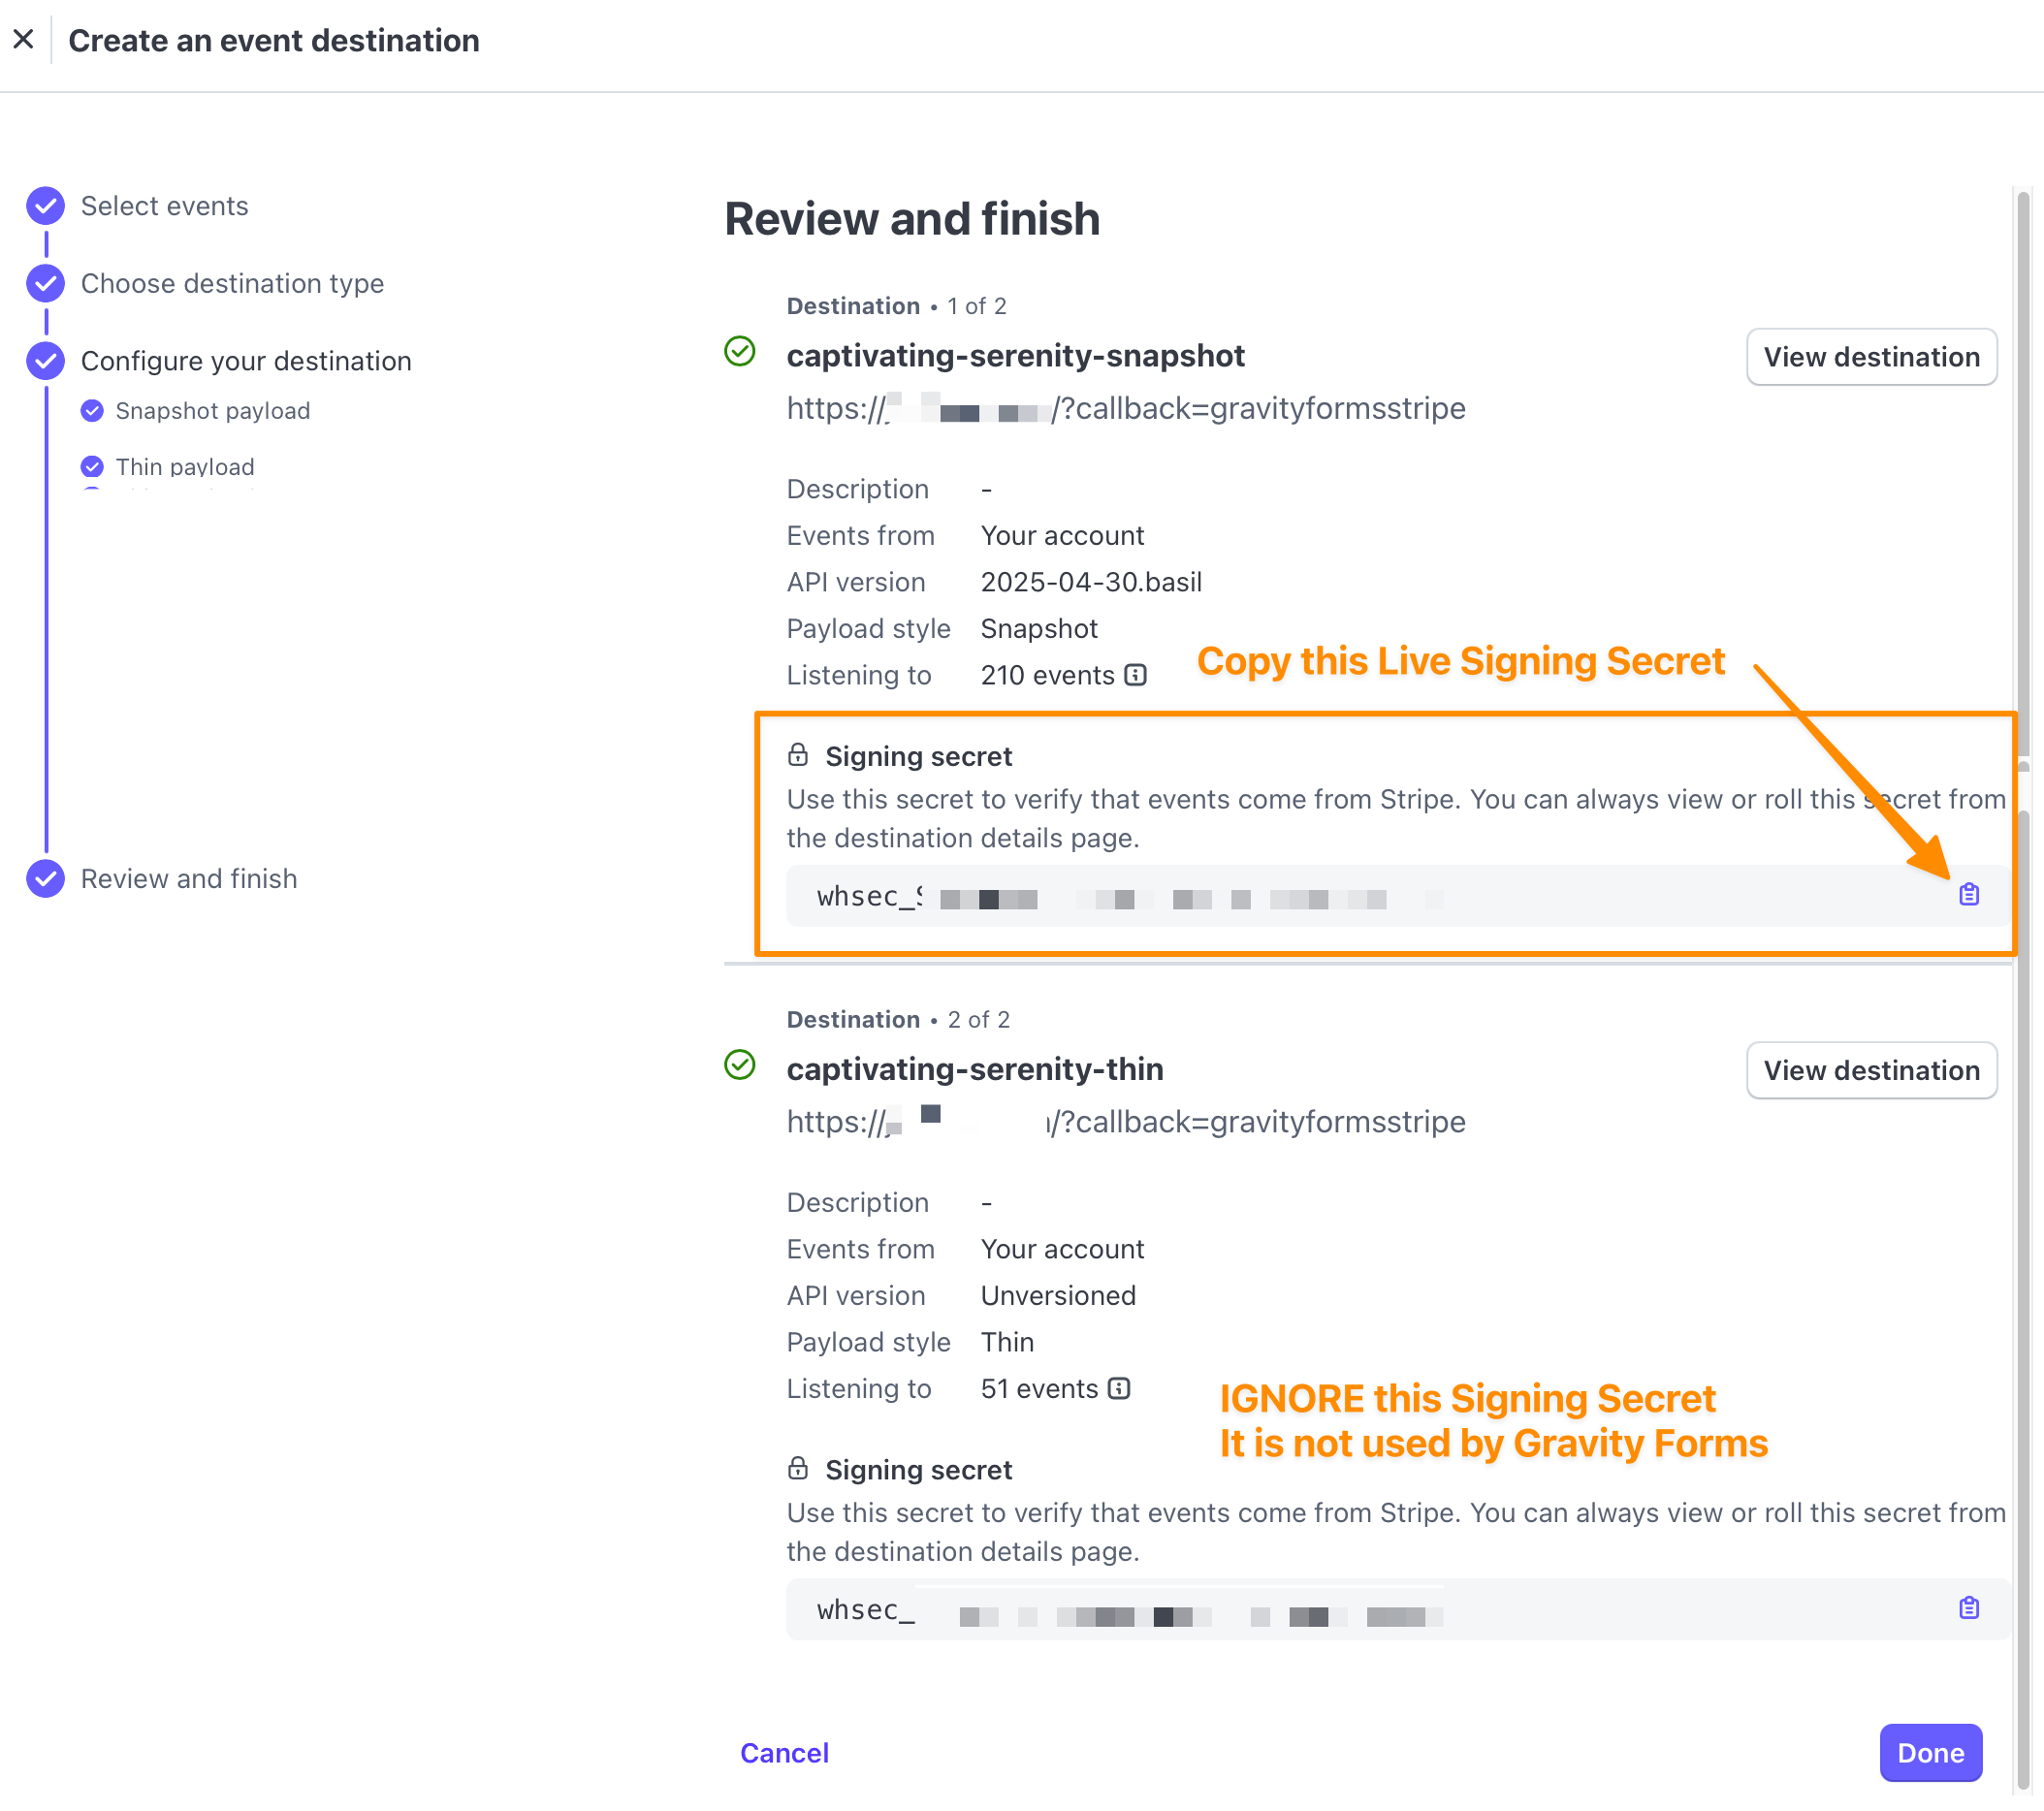
Paste the Signing Secret from the Stripe Webhooks page into the Stripe settings. As you are configuring the Live webhook in this section, paste the Signing Secret from Stripe into the Live Signing Secret field.
Follow the process below for Creating a Webhook Endpoint in Test to complete the Test Signing Secret if you are using your Test environment in Stripe.
Creating a Webhook Endpoint in Test
Log into your Stripe account Test Workbench and select Create an event destination:
You will know you are configuring a Test Webhook by the ‘Test Mode‘ banner at the top of the screen.
Much of this process mirrors the Live configuration above, except you will not have to configure two payload types. We’re repeating the steps to note the differences.
Under Select Events, Your account will be selected by default:
- For Events from select Your account which will be selected by default.
- For API Version, select the latest API version.
- For Events, you have the option to select specific events or all events. Click the checkbox to Select all.
You will receive a warning that “Selecting all events may increase latency and cause poor performance.” You can ignore this notice. You can also select individual events in this list, but at a minimum you must select all the events from the gform_stripe_webhooks article. This list is subject to change.
Click Continue to confirm Event selection.
Under Choose destination type, select Webhook endpoint and click Continue.
Under Configure your destination, add your Endpoint URL and click Create Destination.

Just like above, the Endpoint URL for your website will be provided below the View Webhooks Instructions link under the Stripe Settings screen. There is a useful button for Copy URL which will copy the Endpoint URL to your clipboard so it can be easily pasted into the screens at Stripe.
Note: In versions of Stripe prior to 6.0, the link to the Endpoint URL was included in the View Webhooks Instructions modal.
The Endpoint URL is determined by your website url, i.e https://your_website.com/, followed by ?callback=gravityformsstripe
As an example, if your website was https://www.example.com, you would use https://www.example.com/?callback=gravityformsstripe
Under Event Destinations, Overview, you will receive the final screen for the Test Endpoint:
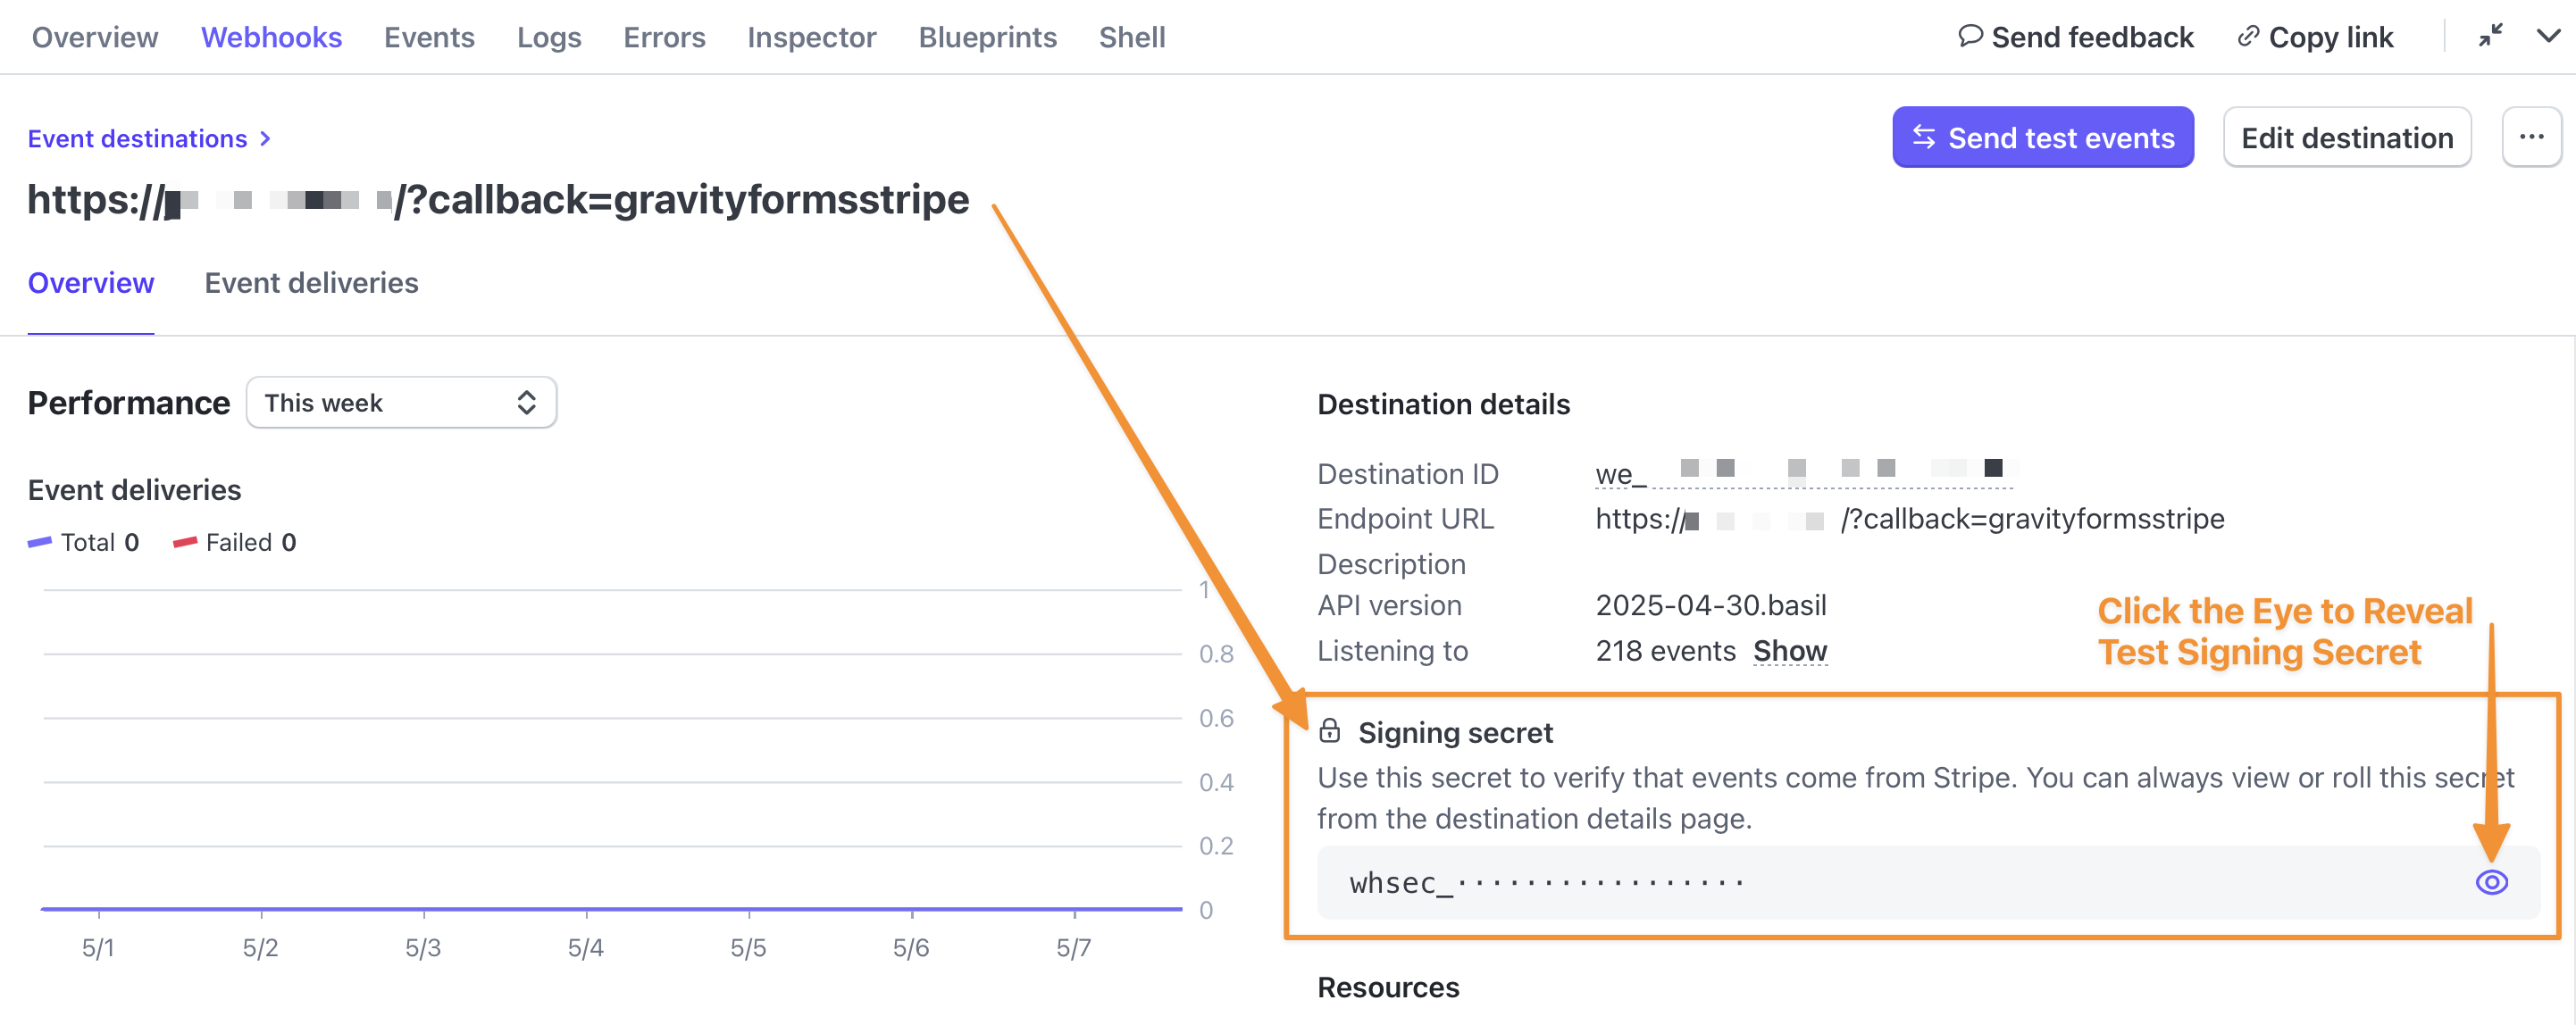
You can reveal the Test Signing Secret by clicking the eye under Signing Secret in the above screen.
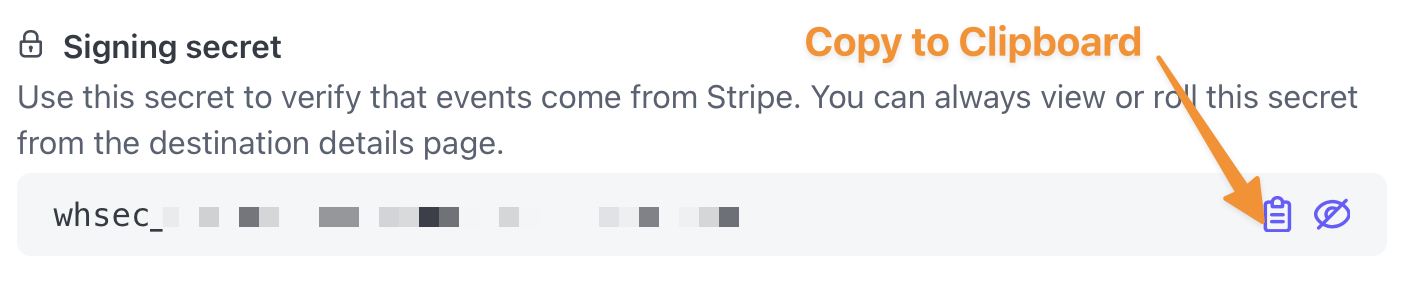
Once revealed, you can click the clipboard icon to Copy the Test Signing Secret to the Clipboard. The Signing Secret you receive at the end of this process goes into the Test Signing Secret under the Stripe Settings screen.
Confirming Webhooks are Enabled
Check the I have enabled the Gravity Forms webhook URL in my Stripe account box.
Click Save Settings at the bottom of the page.
Payment Collection
This option was introduced in Stripe version 2.6. It is not shown on the Settings page for earlier versions.
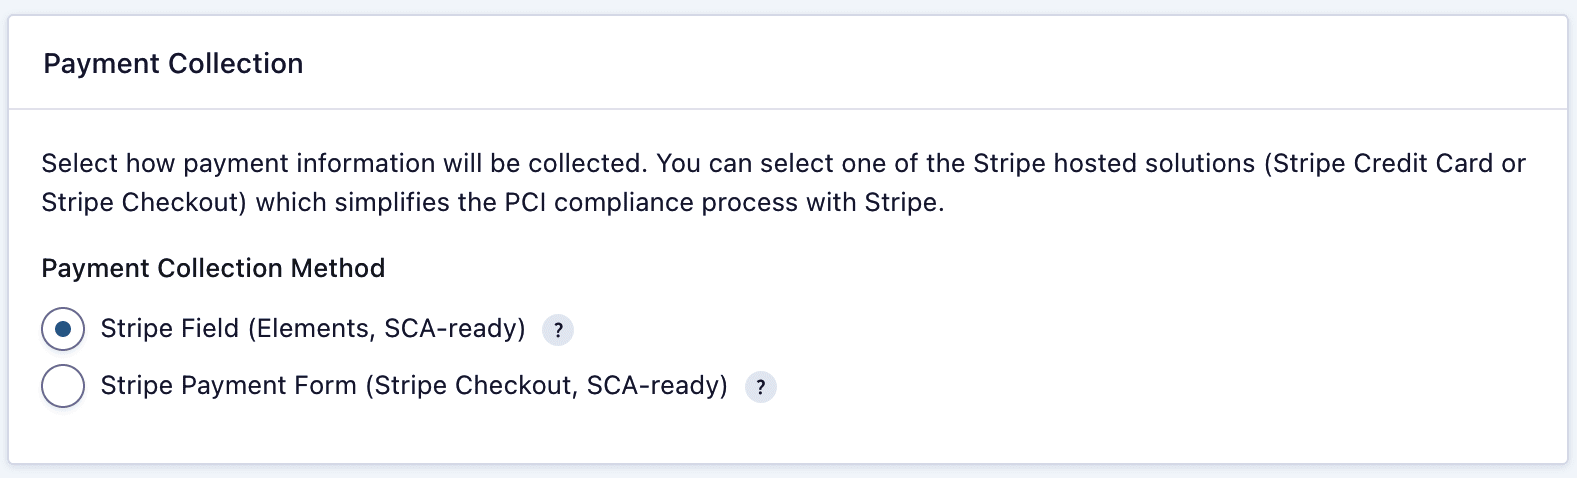
- Scroll to the Payment Collection section.
- Select the Payment Collection Method to determine how your form will obtain payment information. See this article for more information on the payment collection methods offered.
Once you have entered your Stripe settings, you’re ready to begin Setting Up a Stripe Compatible Form.
Notes
- There is a maximum limit of 16 webhook endpoints per Stripe account.
- Stripe Checkout can only be tested/used on a public site. If your site is not public, you won’t be able to see the Stripe Checkout page.
- The Stripe settings layout was modified in Stripe Add-On version 2.8. For setting up older versions, refer to this article.