Introduction
Gravity Forms uses WordPress and software development best practices to make our products as compatible as possible with other plugins and themes. However, some we cannot guarantee the same from third party software, and the sheer variety of plugins and themes out there means that in lots of cases, an issue with a form can be whittled down to a conflict with a third party product. This guide provides instructions for determining if an issue you are experiencing with Gravity Forms may be caused by a theme or plugin conflict, and is often a required first step for a new support ticket.
For most conflicts you can use the WordPress.org community official Health Check & Troubleshooting plugin.
This plugin allows you to disable other plugins and switch your site to a default WordPress theme, only for the current logged in user, therefore allowing you to perform the testing without affecting your visitors (or other logged in users).
Quickstart Guide
- Backup your site.
- If the form is currently embedded using a third-party builder or modal popup, put it on a test page using the WP default editor.
- If you’re using caching or JavaScript optimizations, turn them off.
- After the above, if the issue persists, install and activate the Health Check & Troubleshooting.
- Enable the Troubleshooting mode, starting with only Gravity Forms enabled.
Before you start
A backup is always advised
Although using the Health Check & Troubleshooting plugin is generally trouble-free, it is advised to create a backup of your WordPress as good practise. Because you know what will happen the one time you forget this step…
If using a third-party builder or modal to embed the form
For the troubleshooting, you will want to create a test page, to embed your form directly using the WordPress form editor, without third-party builders or modal solutions.
Both WordPress Classic Editor and Gutenberg are supported.
If the page is being cached or minified by a plugin or hosting company
Caching and automatic JavaScript optimization techniques have been known to cause issues with plugins and even core WordPress features. It’s great to cache static pages to speed up loading times, but caching dynamic pages where you do changes often is not always a good practice. additionally, trying to automate the optimization of the scripts on the page without knowing each script’s needs is a possible way to break JavaScript related features.
So if your page is being cached or using any JavaScript related optimization done by a plugin, a CDN (e.g. CloudFlare, Sucuri, KeyCDN, etc) or your host using an internal proxy, Varnish, Redis object cache or any other caching engine, make sure to flush the cache and turn off caching and JavaScript optimizations completely during testing. Failure to do this can create false positives due to cached resources or the optimizations done.
Below you can find links with directions on how to exclude pages from most popular caching solutions:
- Breeze – CloudWays
- CloudFlare
- NitroPack
- Speed Optimizer by SiteGround (aka SiteGround Optimizer and SGO)
- Sucuri
- W3 Total Cache
- WP Engine
- WP Fastest Cache
- WP-Optimize
- WP Rocket
Some Hosts like Kinsta require the user to contact their support to request excluding the desired pages from their cache.
Fresh Forms for Gravity is a plugin that can help to deal with caching automatically in most cases.
Installing the Health Check & Troubleshooting plugin
Limitations
Features and Add-Ons requiring a Manual Conflict
The Health Check & Troubleshooting plugin will not affect your visitors or other logged in users, as the changes done are not permanent but dynamically applied to the current logged in user. This is a benefit but also means that you cannot use this plugin for issues where you need to be logged out, or an unauthenticated or admin-ajax.php request is done. For these cases, you need to perform a manual conflict test instead.
Below you can find a list of features and add-ons where the Health Check & Troubleshooting plugin is not suitable for troubleshooting.
- Form Editor issues.
- Chained Selects Add-On.
- Constant Contact Add-On.
- Dropbox Add-On.
- Mollie Add-On.
- Partial Entries Add-On.
- PayPal Checkout Add-On.
- reCAPTCHA Add-On.
- Signature Add-On.
- Square Add-On.
- Stripe Add-On.
- Webhooks Add-On.
- Any other Add-On using the Background Feed Processor or JavaScript based processing.
Must-Use and Drop-in Plugins
Must-Use and Drop-in plugins can’t be disabled using the WordPress admin interface, the only way to disable them is deleting their files. If your site is using this type of plugins, you will need to use a FTP client to download a copy and delete them for testing.
The plugin is available in the WordPress.org repository. Go to WordPress Plugins -> Add New page, search for it and install.
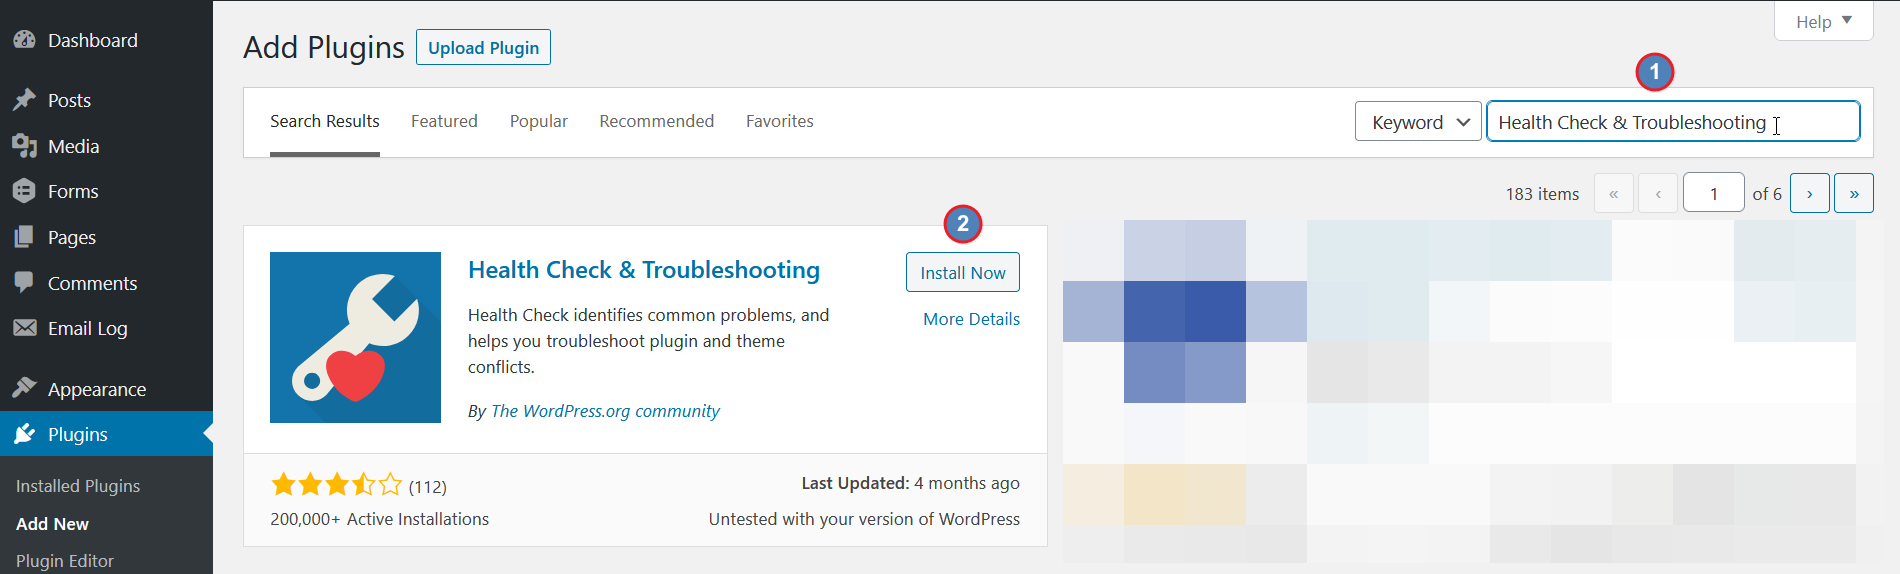
Once WordPress finishes installing the plugin files, the Install Now button will change to Activate. Click it.
Enabling the troubleshooting mode for Gravity Forms.
Now that you have the plugin installed, enable the troubleshooting mode for Gravity Forms by going to the Plugins page, locate Gravity Forms on the list, and click the Troubleshoot link.

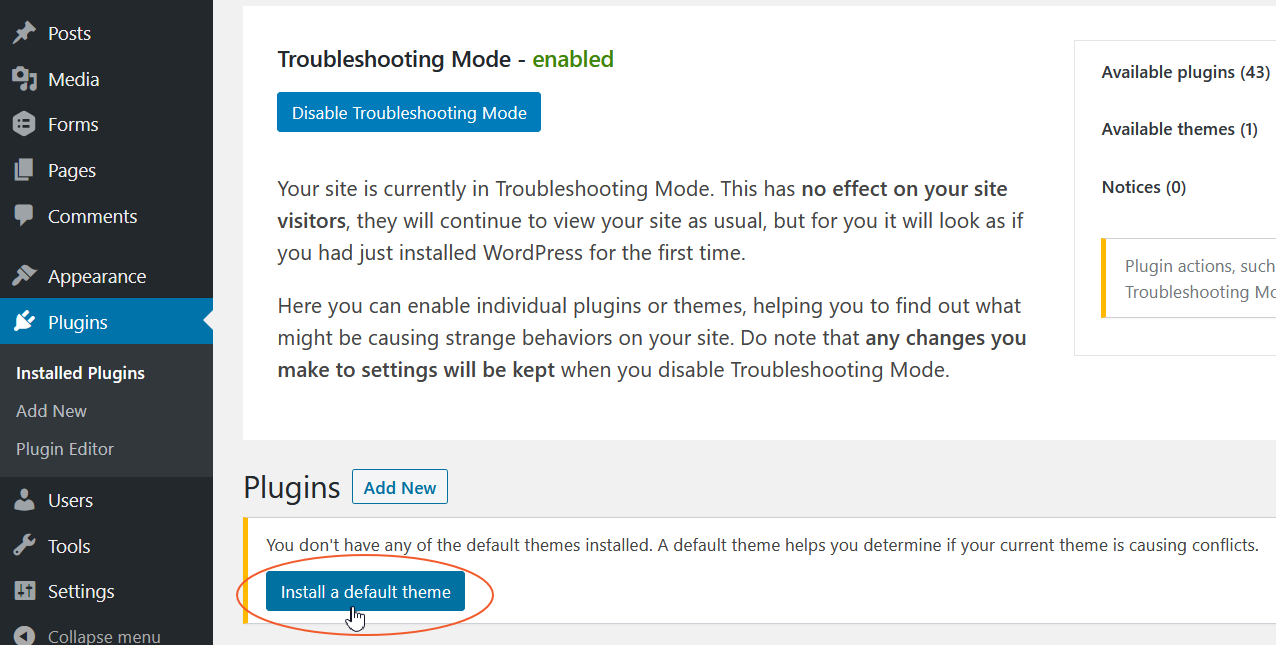
You should be seeing your site now with only WordPress core features. All plugins will be disabled except for Gravity forms, and a default WordPress theme enabled. If you don’t have a default theme installed, it will warn you. Follow this process to install one:
Click the Install a default theme button.
On the new screen, click on the Install button, wait for the theme files to be installed, then click on the black cross icon on the left:

Using the troubleshooting mode to find third-party conflicts
With only the Gravity Forms plugin active, and a default WordPress theme, you are ready to start looking for conflicts.
If your form requires any of the official Gravity Forms add-ons, like User Registration, Advanced Post Creation, Stripe, etc, you can enable those also. But keep the first test limited only to official Gravity Forms add-ons. Remember the goal of this test is to find out if the issue is caused by a third-party software.
Now try and replicate the issue you were experiencing in this reduced environment.
No issue on the first test
If you experience no re-occurrence of the issue, then continue to expand your testing scope by:
- Enable one additional plugin.
- Test again.
- Issue found? Then you have your culprit.
- Working without any issue? Then repeat 1 and 2.
This will hopefully lead you to the problematic plugin.
The issue persists on the first test
If you’re still able to replicate the issue in the reduced environment (that is, after enabling the troubleshooting mode with all the third-party plugins disabled and using a WordPress default theme), then you will want to contact the Gravity Forms Support team for assistance.
If you created a ticket already, just reply to the latest message there. If have not yet opened a ticket on this issue, create one now and provide details about the issue, and the testing done already.
All is working as expected even after enabling all the plugins
If you end the troubleshooting with this result. It means the issue is most likely being caused by something your theme is doing. Contact your theme developer for assistance.