Introduction
The new Gravity Forms Template Library gives you a speedy way to add a pre-built form to your website. Additionally, form templates are available on our website, or you may have inherited a form from a previous designer or website admin. Out of the box you may have most of the fields you need, but your form will most likely need some customizations to suit your particular needs.
This article covers a host of recommended steps and checks you should perform when tailoring a template form to suit your site.
Overview
We recommend the following steps in order to make sure you have covered all your bases for customization. Each of these steps are described in more detail below.
- Review the “Next Steps” Instructions included on the form
- Review and edit the form fields
- Configure confirmations
- Configure notifications
- Setup the required feeds
- Final review
- Test! Test! Test!
Customization Steps
Review “Next Steps”
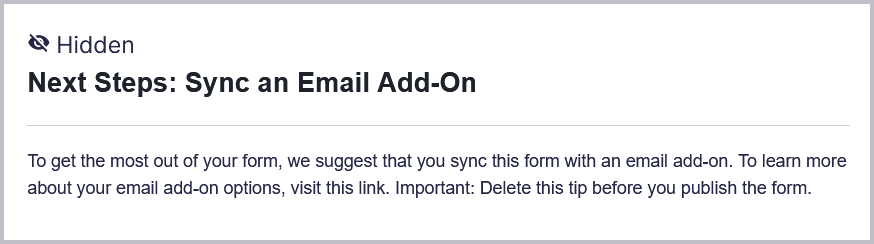
Many form templates have a comment (added as a hidden field) at the top of the form with additional configuration instructions for you. If they are present for yours, review those instructions first.
Here’s an example of the field with Next Steps for this form template:
Review the form fields
Run through this checklist of common customizations for the fields on your new form. The links below are to additional user guides on that topic.
- Remove any unnecessary fields. The less extraneous content on your from the easier it will be to work with, and the greater user submission rates you are likely to see.
- Customize the choice fields. Edit any choice fields, such as radio buttons, checkboxes, and drop downs, to ensure they are presenting only the options you want to offer.
- Review required fields. Make sure that you have set the Required field option for all fields you feel are mandatory.
- Customize the Field Labels. Your field labels should be worded to suit your audience. Don’t settle for just the defaults, but at the same time make sure they are easily understood.
- Customize the Field Descriptions. Your field descriptions can not only provide additional descriptions (especially if you concerned that the field label does not communicate clearly enough), but also is a good spot for tips to the user for what to put in this field.
- Customize the Field Placeholders. Your field placeholders provide clear and easily seen advice on what that field expects, e.g. to capture the correct number or date format. Do be wary though that they are not persistent once the field is filled, so consider the use of your field descriptions as well for more complex guidance.
- Include your terms, conditions and policy statements. Our Consent Field is great for capturing the users agreement to your terms and conditions, but you will need to add in your own T&Cs. You can also present policy statements using a HTML Field, which is induced in some of the templates.
Configure Confirmations
After a form is submitted, a confirmation is shown on screen, and you can modify that confirmation as needed. This is an important validation for the user that what they filled in has been accepted, and to set expectations for next steps. Ensure that the existing confirmations make sense for your website.
- Customize the confirmation. If you only plan on one confirmation message for all submitters, then customize the default confirmation to ensure the message is personalized, relevant to your audience, defines any next steps they should expect, and is in a voice that suits your site and audience. See Configuring Confirmations.
- Do you need different confirmations for certain scenarios? You can optionally add additional confirmations to suit particular circumstances. Only one confirmation will be shown, so you will need to use conditional logic to define when each will be shown. See Conditional Logic in Form Confirmations.
Note: the Default Confirmation will not have an option to configure conditional logic. if more than one confirmation exists, the default confirmation will always be used when no other confirmation was triggered.
Configure Notifications
Notifications allow you to notify external parties to a form submission via a tailored email.
- Review the Notifications settings. that are configured for your form. Check the email To and From settings, and ensure that the notification name and content are meaningful to you. See Configuring Form Notifications.
- Do you need more notifications? You can setup as many additional notifications as you like, either to all be sent each submission, or you can conditionally determine which goes when. See this section of the Configuring Form Notifications article for more information on adding notifications.
Setup Required Feeds
A Feed is what Gravity Forms uses to send the data you collect with your form to a third-party service. Such as a payment processor, a CRM or a list mailing service. See “What is a Feed“.
- Identify the feeds you need. Clearly identify the services you need to send your data to.
- Ensure you have what is required for each. You will likely need to have additional add-ons installed to support communicating with the service in question. Make sure you have downloaded and installed what you need before you start adding feeds.
- Configure your feed (or feeds). Each official Gravity Forms Add-On includes a user guide for configuring feeds specifically for it. You can find those Add-On User Guides here, or refer to the documentation provided for any third party add-ons.
Final Review
Now that you are happy with your form fields, confirmations, notifications and feeds, you should review your Form Settings.
This will help configure generic things like the label placement, required fields indicator, entry limits, and form restrictions. This Form Settings article covers all the settings you will find there.
Test your form. Then test it again!
You have form settings, form fields, confirmations, notifications and feeds. No matter how experienced you are, the odds are you missed something!
Run multiple test submissions from you form to ensure it behaves as expected.
- did all the required field behave properly?
- were the expected field formats communicated clearly>
- did the right confirmation get shown?
- did the notification provide the info needed to the person who needed it?
- test all your conditional logic combinations to ensure the right logic works for each scenarios you had mapped out.
- did your feeds communicate properly with external services? (ensure you sue sandbox or test modes for sensitive services when testing, such as payment gateways).
- try to think of some more test scenarios!
- get someone else to try it! Nothing stress tests a form than a new set of eyes.
Need More Help?
Check out our user guides for more information. Contact our awesome support team if you have more questions, or look for answers on our user forums. Someone somewhere has probably solved your problem!